


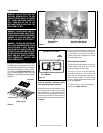
Special offers from our partners!

Find Replacement BBQ Parts for 20,308 Models. Repair your BBQ today.

5
NOTE: DIAGRAMS & ILLUSTRATIONS NOT TO SCALE.
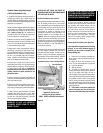
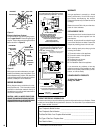
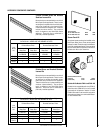
Outside Combustion Air Controls
Many appliances are equipped, when installed,
with an outside (make-up air) vent system
that is designed to provide the appliance with
outside make-up air for combustion when in
operation. The outside air control lever for
the outside air system is standard on all
appliances but should not be operated if the
complete system is not installed. Refer to
Figure 4
. When the complete outside air vent
system is installed, the installer will remove
the securing screw from the combustion air
control lever located on the right side (EBVST,
EBVPF and EBVCL), or left side (EBVCR) of
the fireplace opening.
If the securing screw has not been removed and
you have reason to believe that you have a
complete outside air system, contact your dis-
tributor to have your appliance inspected for
the presence of the complete system. DO NOT
assume that you have this system in place.
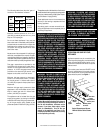
Outside Air Control Lever
and Securing Screw Location
(EBVST, EBVPF and EBVCR Units Shown)
Figure 4
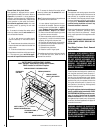
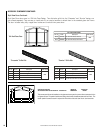
To open the outside air shutter, open the
botttom control access panel, reach into the
gap between the firebox bottom and the
modesty panel, and pull the outside air con-
trol lever all the way out. The outside air
shutter should be fully open when the fire-
place is in use and completely closed when
the fireplace is not being used. Closing it
when not in use will prevent outside cold air
from entering the dwelling.
CAUTION: DO NOT TOUCH THE FRONT EN-
CLOSURE GLASS WITH YOUR HANDS WHILE
THE FIREPLACE IS IN USE.
Venting Action and Safety Limit Operation
If you suspect that the appliance is not venting
properly, or you notice windows fogging or
sweating, you may want to conduct the fol-
lowing spillage test:
1 - Place unit in its normally-operated con-
dition, that is, with the glass enclosure pan-
els in place.
2 - Close all doors and windows in the
room. Turn on all exhaust fans in the house.
3 - Light the appliance.
4 - Wait 15 minutes.
5 - To check for venting action, start by
holding a smoke producing device within an
inch of one edge (side edge, not top or
bottom edge) of one glass enclosure panel.
The smoke should be drawn toward the edge
of the glass enclosure panel. Continue the
test by moving the smoke producing device
along the entire length of both side-edges of
the glass door. Repeat the test for all glass
enclosure panels.
6 - If the smoke is not drawn towards the
edges of the glass door turn off the appli-
ance and call a qualified service technican.
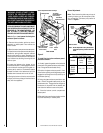
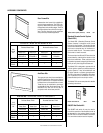
Variable Flame Height Adjustment
( Millivolt Appliances only)
1. All Millivolt appliances are equipped with a
variable gas control valve. Flame height for
these models may be adjusted through a range
between fixed low and high settings while the
appliance is in operation.
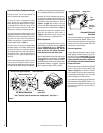
Adjust the flame height as desired after lighting
the appliance by rotating the variable adjust-
ment control knob located on the front of the
valve
(refer to Figure 2)
. (An extension is
provided to this knob so that the adjustment
may be made at the modesty panel.)
2. When lit for the first time, this appliance will
emit a slight odor for 14 hours. This is due to the
“burn-in” of internal paints and lubricants used
in the manufacturing process.
3. Keep lower control compartment clean by
vacuuming or brushing at least twice a year.
More frequent cleaning may be required due to
excessive lint from carpeting, bedding materi-
als, etc. It is important that control compart-
ments, burners and circulating air passage-
ways of the appliance be kept clean.
4. Always turn off gas to the pilot (millivolt
appliances) and let the unit cool down before
cleaning. Before re-lighting, refer to the light-
ing instructions in this manual. Lighting in-
structions may also be found on the pull out
lighting instruction labels attached to the
gas control valve.
5. Always keep the appliance area clear and
free from combustible materials, gasoline and
other flammable liquids.
6. Remember, Millivolt appliances have a con-
tinuous burning pilot flame. Exercise caution
when using products with combustible vapors.
7. Clean the front glass enclosure only when
necessary and when the unit is cool. Wipe
surface with clean, dampened, soft cloth. Fol-
low with dry, soft towel as desired. Take care
not to scratch the glass surface.
Outside Air Control Lever with Stop Behind
Securing Screw
Outside Air Shutter in the
Closed Position
Control Compartment Access Panel
WARNING: DO NOT USE ABRASIVE
CLEANERS. NEVER CLEAN THE GLASS
WHEN IT IS HOT.
WARNING: DO NOT OPERATE THE SHUT-
OFF LEVER UNLESS A COMPLETE OUTSIDE
COMBUSTION AIR SYSTEM HAS BEEN IN-
STALLED WITH YOUR APPLIANCE.