


Special offers from our partners!

Find Replacement BBQ Parts for 20,308 Models. Repair your BBQ today.

9
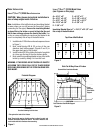
NOTE: DIAGRAMS & ILLUSTRATIONS ARE NOT TO SCALE.
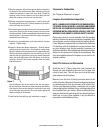
Clearance to Combusibles
See “Required Clearances” on page 7.
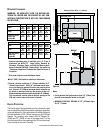
Fireplace Pre-Installation Preparation
NOTE: LENNOX HEARTH PRODUCTS RECOMMENDS PRO-
FESSIONAL INSTALLATION BY A LICENSED AND BONDED
INSTALLER. SEE YOUR DEALER FOR RECOMMENDATIONS.
IMPROPER INSTALLATION OR MIS-USE WILL VOID YOUR
WARRANTY AND CREATE A SERIOUS SAFETY HAZARD.
Remove any doors or screen materials from the fireplace
opening. Remove the damper mechanism completely. Also
remove grates or ember catches inside the fireplace hearth.
If your fireplace is equipped with a smoke shelf or baffle and
if it interferes with the installation it may be removed. Side
and rear refractory may also be removed, if necessary, to
facilitate installation. No modifications shall be done unless
allowed on the previous list. Retain all removed parts, they
must be reinstalled before the fireplace can be used in it’s
original condition.
insert Pre-installation PreParation
Install the two 3” (76mm) long bolts (with the head up)
through the nuts attached to the insert on the lower rear
corner of each side. This will allow you to level the insert
when placed into the fireplace.
Measure from the front of the top surround mount to the
center of the flue. Determine if there is an alignment problem
in connecting a liner from the chimney to the insert’s flue.
If there is an alignment problem, connection can be made
using a short piece of stainless flex or a stainless steel offset
box (available from your dealer). Before installing the liner,
make any attachment brackets or drill any holes in the liner,
offset box, or insert. Once installed, it may be difficult or
impossible to drill additional holes.
12. Slide the extension draft rod through the bracket attached to
the bottom of the left side hearth plate, making sure the end
without the grooves is toward the stove body. Thread the
coupling nut on the end closest to the stove body and then
thread the coupling nut on the rod from the stove.
13. Slide the stove tight to the fireplace face. Level the stove with
the leveling bolts using a 3/4” socket, extensions (to reach in
to the bolt head), and a ratchet.
14. To install the decorative brass trim on the top surround panel,
connect the 3pieces at the mitered corners using the corner
brackets supplied. Slide the assembled trim down onto the top
surround panel. The surround should fit snugly in the groove
towards the back of the trim.
15. Install the top surround panel on the stove with the 3 screws
supplied. Tighten snugly.
16. Locate the blower and blower extensions. Slide the blower
partially under the hearth plate. Run the blower cord through
the slot in the blower housing extension o the appropriate side.
Slide the left housing extension over the draft rod on the left
side and slide the right housing using the method described
below (the ends without the cord slots attach to the blower
housing). Now slide the blower assembly under the hearth
plate and center it.
Use the adhesive strip on the inside of the side trim pieces.
Be sure to position the side trim pieces exactly as desired then
slide the trim piece out just enough to remove the cover strip
on the adhesive and press the trim piece tightly against the
blower and hold for 30 seconds.
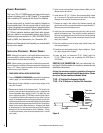
17. Install the brick and baffle as per instructions on page 6.
Figure 7