


Special offers from our partners!

Find Replacement BBQ Parts for 20,308 Models. Repair your BBQ today.

z WARNING
A strong gas smell, or the hissing sound of
gas indicates a serious problem with your gas
grill or the LP gas tank. Failure to immedi-
ately follow the steps listed below could result
in a fire or explosion that could cause serious
bodily injury, death, or property damage.
• Shut off gas supply to the gas grill.
• Turn the control knobs to OFF position.
• Put out any flame with a fire extinguisher.
• Open grill lid.
• Get away from the LP gas tank.
• Do not try to fix the problem yourself.
• If odor continues or you have a fire you
cannot extinquish, call your fire
department. Do not call near the LP
gas tank because your telephone is
an electrical device and could create a
spark resulting
in firc cnd/cr c;,plcslcn.
Checking For LP Gas Leaks
Never test for leaks with a flame. Prior to first
use, at the beginning of each season, or every
time your LP gas tank is changed, you must
check for gas leaks. Follow these four steps:
1. Make a soap solution by mixing one part
liquid detergent and one part water.
2. Turn the grill control knobs to the full OFF
position, then turn the gas ON at source.
3. Apply the soap solution to all gas
connections. If bubbles appear in the soap
solution the connections are not properly
sealed. Check each fitting and tighten or
repair as necessary.
4. If you have a gas leak that you cannot
repair, turn off the gas at the source, discon-
nect fuel line from your grill and call
1-800-4-MY-HOME or your gas supplier for
repair assistance.
.
7.
.
9.
10.
11.
/!'X WARNING
Failure to open Grill or Side Burner Lid
during the lighting procedures could
result in a fire or explosion that could
cause serious bodily injury, death, or
property damage.
Set control knobs to OFF and open the LP gas
tank valve slowly until 1/4 to 1/2 open.
For grill lighting push and turn the LEFT control
knob to HIGH. To light the Side Burner turn its
control knob to HIGH.
Immediately press the electric ignitor for 3-4
seconds to light the burner.
If the burner does not light, turn the control knob to
OFF, wait 5 minutes for gas to clear, then retry.
Once the left grill burner is ignited, the adjacent
burner can be lit by simply turning its control knob
to HIGH.
Adjust control knobs to your desired cooking
temperature.
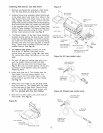
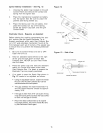
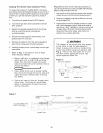
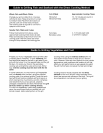
Lighting Your Grill by Match
To light your gas grill by match, follow steps 1 through
6 of the Basic Lighting Procedures. Then, insert a lit
match through the lighting hole on either side of the
grill. See Fig. 16. Turn the nearest control knob to the
HIGH setting to release gas. The burner should light
immediately.
Figure 16
_HTING
HOLE
Basic Lighting Procedures
1. Familiarize yourself with the safety guidelines at
the front of this manual. Do not smoke while
lighting grill or checking gas supply connections.
2. Be sure the LP gas tank is filled.
3. Check that the end of each burner tube is properly
located over each valve orifice.
/!X,WARNING
Never lean over the grill cooking area while
lighting your gas grill. Keep your face and
body a safe distance (at least 18 inches)
from the lighting hole or burners, when
lighting your grill by match.
4. Make sure all gas connections are securely
tightened.
5. Open the Grill Lid or Side Burner Lid, depending on
the burner you are lighting.
17