Special offers from our partners!

Find Replacement BBQ Parts for 20,308 Models. Repair your BBQ today.

11
English
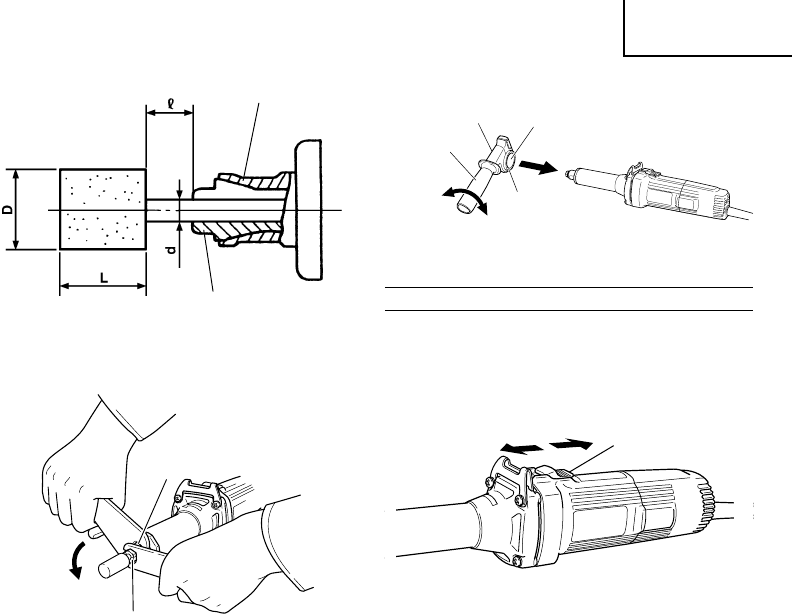
Wheels can be simply attached and detached by using
two wrenches. (Fig. 3)
NOTE:
ⅷ
Do not tighten the collet chuck by inserting a shaft
thinner than the regular shaft diameter (1/4’’
(6.35mm)) in the chuck or in an empty condition.
This practice will damage the collet chuck.
ⅷ
When installing a wheel with shaft, tighten the
collet chuck after applying a small quantity of
spindle oil (or sewing machine oil) to the tapered
portion indicated in Fig. 2.
7. Using the side handle (Fig. 4)
Be sure to use the side handle to avoid the risk of
severe electrical shock.
Attach the side handle to the machine as follows.
(1) Loosen the side handle grip and insert the side
handle to the nose bracket part of the machine from
the flange part of the side handle sleeve.
(2) Set the side handle to a position that is suited to
the operation and then securely tighten the side
handle grip.
GRINDER OPERATION
1. Switching operation (Fig. 5)
(1) When throwing the switch lever to the ON side,
power is applied; when throwing it to the OFF side,
power is switched off.
(2) After installing a new wheel, “test” the condition
of the wheel by allowing the grinder to operate for
180 seconds while the wheel is pointed away from
you. Keep your hands and body away from the
wheel at all times.
2. Precautions on operation
(1) Lightly press the wheel to the material to be ground
when grinding materials, high-speed revolution is
necessary. Use a hand grinder with high-speed
revolution, minimizing the pressing force.
(2) Dressing the wheel
After attaching a wheel, adjust deflection of the
wheel center by using a dresser.
If the wheel center is eccentric, not only precise
finishing cannot be achieved but also grinder
vibration increases, lowering grinder accuracy and
durability.
A clogged or worn wheel will soil the finishing
surface or lower grinding efficiency. Occasionally
dress the wheel by applying the dresser.
Fig. 2
Fig. 3
Spindle
Tighten
Collet chuck
Fig. 4
Side
handle
Flange part
Tighten
Loosen
Side
handle
grip
Fig. 5
Switch
OFF
ON
Side handle sleeve
Tapered portion
Collet chuck
01Eng_GP2S2_US 4/5/11, 10:25 AM11


