


Special offers from our partners!

Find Replacement BBQ Parts for 20,308 Models. Repair your BBQ today.

Part # 4526884 Rev 4 (10/08/10)Page 8
SAFETY PRECAUTIONS
Always follow these safety precautions when operating the
Xpress Grill.
• THIS GRILL MUST be operated by persons who have
been given adequate training.
• THIS EQUIPMENT MUST ONLY BE OPERATED UNDER AN
APPROVED HOOD SYSTEM.
• DO NOT operate the grill without reading this operation
manual.
• DO NOT operate the Xpress grill unless all service and
access panels are in place and fastened properly.
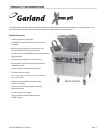
The Garland Xpress Grill is a semi-automatic cooking
appliance. The upper platen is lowered automatically,
following the manual, two-handed initiation of the cooking
cycle, and the upper platen is raised automatically upon
completion of the cooking cycle.
When two sided cooking, the area between the upper platen
and the griddle plate should be regarded as a “danger zone.”
During two sided cooking the operator must not be within
this danger zone. When used as a at grill, then this area is no
longer a danger zone, the platens do not move.
For whatever reason, be it cleaning, maintenance, or normal
operation, any exposed person must use extreme caution if
within this danger zone.
In two side cooking the upper platen remains in the lowered
position by nature of its own weight. It is not locked down. It
can be raised by lifting up on the handle on the front of the
platen.
The Xpress Grill may during its operation emit airborne noise
equivalent to a continuous A weighted sound pressure level
of 73dB(A).
WARNING: To avoid serious personal injury:
• DO NOT attempt to repair or replace any part of the
Xpress Grill unless all main power supplies to the grill
have been disconnected.
• USE EXTREME CAUTION in setting up, operating and
cleaning the Xpress Grill to avoid coming in contact
with hot grill surfaces or hot grease. Suitable protective
clothing should be worn to prevent the risk of burns.
• DO NOT clean this appliance with a water jet.
• DO NOT apply ICE or COLD WATER to a HOT grill surface.
• NOTE all warning labels and markings a xed to the grill.
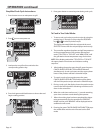
WARNING: After turning the master power switch to the
START position, the grill will go through initialization. If
the upper platens are in the lowered position they will
return to their raised upper position. This movement takes
approximately 8 seconds.
INSTALLATION
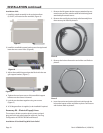
Rating Plate Location
IMPORTANT: Rating plates for this appliance are located in
two places: 1) inside back panel on left side, 2) under front
control panel on center.
General Information
This equipment must be installed by a competent factory
trained, certi ed, licensed and / or authorized service or
installation person.
WARNING: This appliance must be properly grounded.
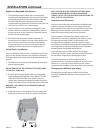
Prior to installation, the four casters, supplied loose with the
grill, must be securely located on the underside of the base.
The casters tted with a brake must be located at the front of
the grill.
This appliance should be connected to a potential
equalization system. A labeled equipotential bonding point
is tted to the rear of the grill.
It is recommended that this grill be connected to a residual
current,, (earth leakage),, device with a tripping current not
exceeding 30mA. The leakage current of this grill will not
exceed 5mA.
CAUTION: Prior to installation, check the electrical supply
to ensure input voltage and phase match the equipment
voltage rating and phase. See data plate located rear left side
of grill and lower front panel.
Grill is to be located directly under ventilation system.
Once installed in the grill station underneath the ventilation
system, the platens, in their highest position, must not
interfere with the lower lip of the ventilation system hood.
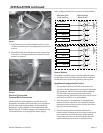
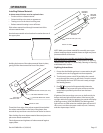
The raised position of each platen is adjusted by raising
or lowering the upper of the two microswitches, (limit
switches), in the rear of the grill. The lower microswitch
position must not be adjusted.
Grill plate must be level front to back, side to side and
diagonally. This leveling must be done with the unit under
the hood and in it’s normal operational position to prevent
warping of the grill plate.
NOTE: Fuses are installed to prevent damage in the event of