


Special offers from our partners!

Find Replacement BBQ Parts for 20,308 Models. Repair your BBQ today.
Part # 4526884 Rev 4 (10/08/10) Page 13
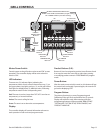
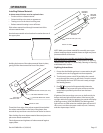
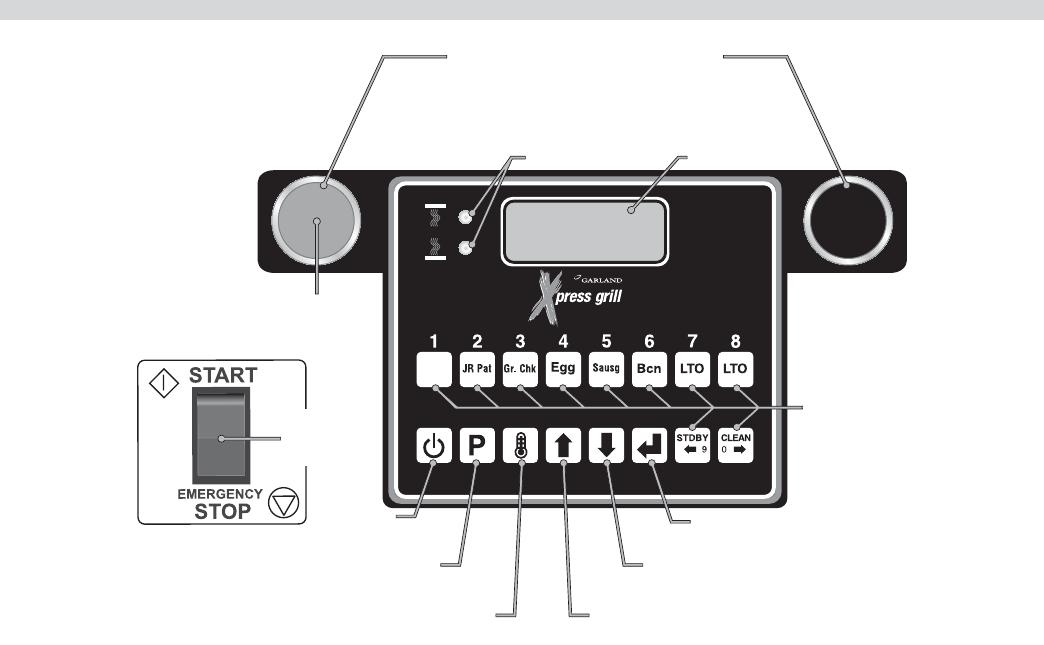
Master Power Switch:
Controls power to the grill and must be turned “ON” to start
operation. The controller display will be active when the
switch is “ON”.
LED Indicators:
There are two, (2), indicator lights, indicating the
temperature status of each control’s heat zones; one, (1), on
the upper platen, (top light), and one, (1), on the grill surface.
Each light can display three, (3), di erent colors, indicating
temperature status for the corresponding zone.
Red: The zone is too hot, (more than 79°F/45°C over the set
temperature), or heat zone failure.
Amber: The zone is calling for heat.
Green: The zone is at or above the set temperature.
Display:
The controller display will contain information relevant to
each operation in both cook and program modes.
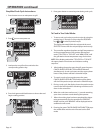
16-CHARACTER
2-LINE DISPLAY
PRODUCT
BUTTONS
LED
INDICATORS
POWER
BUTTON
PROGRAM
BUTTON
TEMPERATURE
BUTTON
ENTER
BUTTON
DOWN ARROW
BUTTON
UP ARROW
BUTTON
WHEN PUSHED SIMULTANEOUSLY:
"START COOK TIME COUNTDOWN" (flat grill cooking)
OR "LOWER PLATEN" (two-sided cooking)
MASTER
POWER
SWITCH
CANCEL/
RAISE PLATEN
BUTTON
BIG PAT
GRILL CONTROLS
Product Buttons (0-9):
Buttons 0-9 can be assigned to product items. Buttons 9 and
0 are used to move the cursor left or right when creating
or modifying product names in “PROD NAME LIB” program
mode.
Power Button:
After the main power switch is turned on, this button will put
the control into cook mode. If pressed again, the control will
go back to displaying “OFF.”
Program Button:
The primary function is to access Programming and
Calibration of the grill. Push and hold for ve (5) seconds.
Display will ask for the code. After entering code, ve
programming features will be accessible “MENU ITEMS,”
“SYSTEM INFO,” “SYSTEM SETUP,” “SERVICE MODE,” and
“PRODUCT NAME LIB.”