


Special offers from our partners!

Find Replacement BBQ Parts for 20,308 Models. Repair your BBQ today.

Part # 4526884 Rev 4 (10/08/10) Page 17
To Cook in Flat Grill Mode:
1. To start a cook cycle select a product recipe by using the
product keys (1 through 9) or by using the UP/DOWN
keys or to select a product recipe.
The display alternately blinks the recipe and the word
SELECTED 2 times then the recipe will be displayed
continuously.
2. The controller regulates the grill temperature to the set
temperature of the product selected and reads “TOO
COOL” or “TOO HOT” with “MENU ITEM”, until the grill
attains the set temperature range for the item.
NOTE: If the display reads either “TOO COOL” or “TOO HOT” it
will not initiate a cooking sequence.
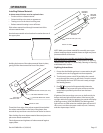
3 After loading the product onto the grill, press the green
CANCEL/RAISE PLATEN BUTTON and BLACK button
simultaneously. That will start a cook cycle if the product
selected is clamshell recipe.
4 To cancel a cook cycle at anytime the press the green
CANCEL/RAISE PLATEN BUTTON .
5. During a cook cycle, the display shows the product recipe
name in the rst line and the remaining cook time count
down in the second line.
6. The display shows the “SEAR” or “FLIP” alarm message
with ashing in the second line if the current cooking
product is at recipe and the sear time or ip time is not
zero.
7. A cook alarm sounds with a repeating beep pattern.
Pressing the black RAISE button acknowledges the “SEAR”
or “FLIP” alarm message if the alarm eld in system setup
is set to MANUAL.
8. The “SEAR” or “FLIP” alarm message stops after 5 seconds
if the alarm eld in system setup is set to AUTO.
9. When a cook is complete, the display shows the product
recipe name in the rst line and a ashing “REMOVE”
message in the second line. A repeating beeping alarm
also sounds.
10. Pressing the black RAISE button cancels the cook done
alarm.
11. The unit revertes back to IDLE mode.
OPERATION continued
Enter Standby Mode:
Stand by mode is used during slow periods to conserve
energy with out a complete shut down of the unit. When
cooking temperatures are again required, pre-heat cook
temperature/time is reduced. Stand by mode temperatures
can be adjusted, see the PROGRAMING section.
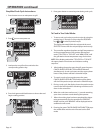
1. Select Standby Mode by pressing or until
“STANDBY” is displayed.
2. Press the GREEN (‘CANCEL/RAISE’) and the BLACK buttons
at the same time. As soon as the upper platen moves
down, the display will read “STANDBY MODE.” (Note: The
rst time Standby Mode is entered, the display prompts
the operator to press ENTER after pressing the GREEN
and BLACK buttons.)
Exit Standby Mode:
1. Press the GREEN (‘CANCEL/RAISE’) button. The upper
platen will raise and the display will read “CANCEL” with
an audible alarm.
To Display the Current Temperatures:
1. Press the button and repeat for each zone to be
displayed...
1st press - LOWER GRILL ZONE
2nd press - UPPER PLATEN
NOTE: The temperatures may be displayed at any time,
including during a cooking cycle.
To View Settings for a Menu Item:
1. Enter Programming; Menu Items, (see Programming)
2. Press to enter “PROGRAMMING MODE MENU ITEMS”
3. Use and to choose the desired Menu Item.
4. Press to scroll through settings for the chosen item.
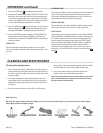
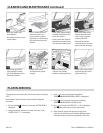
To Clean the Grill:
1. To start a CLEAN MODE select the clean mode recipe by
pressing product key 10 or by using the UP/DOWN keys
or to select the clean mode recipe.
2. The controller regulates the platen and grill temperatures
to the set temperatures of the clean mode recipe. The
display shows the message “CLEAN MODE” in the rst line
and the actual grill temperature in the second line.