


Special offers from our partners!

Find Replacement BBQ Parts for 20,308 Models. Repair your BBQ today.

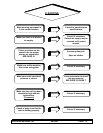
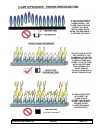
STEP BY STEP SERVICE INSTRUCTIONS
These appliances do require to be serviced. Our best recommendation is that the appliance be
serviced (1) once a year, maybe just before the heating season starts.
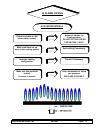
Annual service should and inspection should include:
⇒ Open the two side panels or remove the face frame from the appliance. Vacuum all areas
around the convection blower making sure there are no obstructions near the convection
blower or in the impeller fan blades.
⇒ EG-95 inserts and freestanding fireplaces convection blowers do require lubrication. Use
lightweight oil 20 SAE, 3 in 1 oil, or sewing machine oil (2 drops only). Too much oil will
contract dust and dirt, which could cause premature breakdown of the convection blower.
⇒ Check all wiring for loose connections and damage to any of the wires.
⇒ Check to make sure that the flue is connected and that the flue is not plugged and that it is
free from obstructions.
⇒ Also check to make sure that the fresh air, if installed, is not clogged and that it is free from
obstructions.
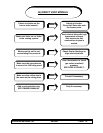
⇒ Open the glass door by undoing the ½” bolt on the right hand side of the appliance, swing the
door all the way open and gently lift the door of the two pins on the left hand side of the
appliance.
⇒ Carefully remove the log set from the firebox. NOTE: The edges of the logs become brittle
with heat over time so they could be damaged when removing the logs. Remove the glowing
ember material making sure not to drop any of the ember material, which could drop into air
passages or drop on the pilot assembly.
⇒ Inspect the pilot assembly for build up on the Thermocouple and Thermopile; also make sure
that the pilot assembly has not been damaged.
⇒ Vacuum all areas inside the firebox in and around the burner tray, control panel and
surrounding areas.
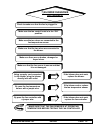
⇒ Carefully replace the logs and glowing embers into the firebox making sure that the log and
ember material are in the correct location (refer to the owner and operators manual).
⇒ Inspect the door gaskets to make sure that it is not cracked broken or frayed. Place the door
assembly back on the two pins on the left side of the appliance, close the door and tighten the
½” bolt on the right hand side, make sure that the gasket is fully sealed (pay special
attention to the corners of the bay window). Visually check for a small gap, if there is a
gap, open the door and fluff the gasket up a little, reinstall the glass and re inspect the gasket
to make sure it has sealed.
⇒ Relight the appliance, before you turn the gas control knob to the “ON” position, do a millivolt
reading from the thermopile. Turn the gas control knob to the “ON” position, before the main
burners are turned “ON” do another millivolt reading at the thermopile to make sure there is no
change.
Sherwood Industries Ltd. ENVIRO PAGE 21