


Special offers from our partners!

Find Replacement BBQ Parts for 20,308 Models. Repair your BBQ today.

13
Lighting Your Grill
NORMAL OPERATION
NORMAL OPERATION
ƽ WARNING: Your Ducane
®
grill was not designed to operate
with the Rotisserie Burner and the Main Burner(s) on at
the same time. Failure to follow this warning will lead
to an overheating condition which would damage grill
components and cause bodily harm.
ƽ WARNING: Keep any electrical supply cord and the fuel
supply hose away from any heated surfaces.
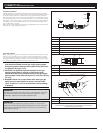
Plug in Accessory Power to Your Grill
Connect your grill to a convenient outdoor outlet. This appliance shall be grounded
while in use to protect the operator from electrical shock. The appliance is equipped
with a 3-conductor cord and a 3-prong grounding-type plug to fi t the proper
grounding-type receptacle. Plug into a GFCI protected outdoor receptacle, where
available.
ƽWARNING: Use only 3-wire extension cords that have 3-prong
grounding-type plugs and 3-pole cord connectors that accept
the plug from the appliance. Only extension cords identifi ed by
the marking with the suffi x letters W-A, and tagged “Suitable for
use with outdoor appliances” shall be used outdoors. Use only
extension cords having an electrical rating not less than the
rating of the appliance. Do not use damaged extension cords.
Examine extension cord before using and replace if damaged.
Do not abuse extension cord and do not tug on any cord to
disconnect. Keep cord away from heat and sharp edges.
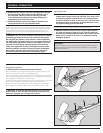
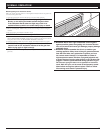
ƽ WARNING: Before each use of your grill it is important to
inspect the full length of the gas line hose. Your hose can be
accessed through the cabinet doors. If it is evident there is
excessive abrasion or wear, or the hose is cut, the hose must
be replaced with a manufacturer recommended part prior to
the appliance being put into operation.
Check your parts list or your authorized dealer for the proper replacement hose
assembly. It will be necessary to open the doors to fully inspect the hose.
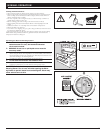
ƽ DANGER: Make sure that the lid is in the full open postion
any time you attempt to light your grill. Failure to open the
lid could lead to delayed ignition which may result in serious
bodily injury or death, or in a fire or an explosion causing
damage to property.
A
B
C
D
E
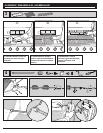
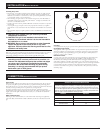
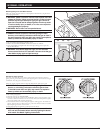
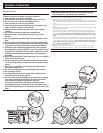
Snap Ignition Operation
ƽ Always open the lid before igniting the burners
Each control knob has its own igniter electrode built in. To create a spark you must
push the control knob in (A) and turn to “START/High” (B).
This action will generate gas fl ow and a spark to the burner lighting tube (C). You will
hear a “snap” from the igniter. You will also see a 3˝ - 5˝ orange fl ame coming from the
burner lighting tube at the left side of the burner (D).
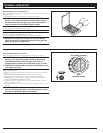
Continue to hold the burner control knob in for two seconds after the “snap”. This will
allow gas to fl ow completely down the burner tube (E) and insure ignition.
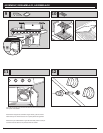
Check that the burner is lit by looking through the cooking grates. You should see a
fl ame. If burner does not light on fi rst try, push control knob in and turn to OFF.
ƽ WARNING: If the burner still does not light, turn the burner
control knob to “OFF” and wait 5 minutes to let the gas clear
before you try again or try to light with a match.
IMPORTANT
If an external electrical source is used it must be electrically grounded in accordance
with local codes and/or the National Electrical Code ANSI/NFPA 70, or the Canadian
Electrical Code, CSA C22.1