


Special offers from our partners!

Find Replacement BBQ Parts for 20,308 Models. Repair your BBQ today.
www.desatech.com
111924-01D 7
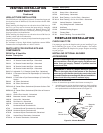
VENTING INSTALLATION
INSTRUCTIONS
NOTICE: Read these instructions completely before
attempting installation.
These models are tested and approved for use with DESA (direct-
vent) pipe components and terminations as well as Simpson-Duravent
direct-vent pipe components and terminations.
The venting system must terminate on the outside of the structure
and can not be attached to a chimney or ue system serving a
separate solid fuel or gas burning appliance. A direct-vent appli-
ance must have its own venting system. DO NOT common vent
this appliance.
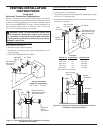
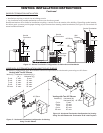
These models are approved to be vented either horizontally through
an outside wall or vertically through a roof or chase enclosure using
the following guidelines:
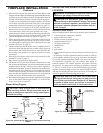
• When venting system terminates horizontally on an outside
wall, you must install a standoff if the termination cap is to be
installed directly on a combustible nish such as vinyl, wood,
stucco, etc.
• Never run the vent downward as this may cause excessive tem-
peratures which could cause a re.
• Vent pipe air space clearances to combustibles are 1" on all sides
except on the horizontal sections, which requires 2" clearance
from the top of the pipe. Where the termination cap penetrates
a combustible wall, 1" air space clearance is required.
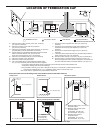
• Snorkel terminations are required when minimum clearance to
grade cannot be met (see Figure 16 on page 11).
• Have replace and selected vent components on hand to help
determine the exact measurements when elbowing or offsetting.
Always use wall restops when penetrating walls and restops
when penetrating ceilings or attic spaces.
• If using a venting conguration of only horizontal venting with
no vertical run, a 1/4" rise for every 12" of run toward the ter-
mination is required.
WARNING: Read all instructions completely and
thoroughly before attempting installation. Failure to
do so could result in serious injury, property damage
or loss of life.
NOTICE: Failure to follow these instructions will void
the warranty.
IMPORTANT: Do not seal vent cap to pipe. Cap must be remov-
able for service.
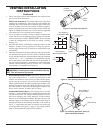
INSTALLATION PRECAUTIONS
• Wear gloves and safety glasses for protection
• Use extreme caution when using ladders or when on roof tops
• Be aware of electrical wiring locations in walls and ceilings
The following actions will void the warranty on your venting system:
• Installation of any damaged venting component
• Unauthorized modication of the venting system (Do not cut or
alter vent components)
• Installation of any component part not manufactured or approved
by DESA
• Installation other than as instructed by these instructions
WARNING: This gas replace and vent assembly
must be vented directly to the outside. The venting
system must NEVER be attached to a chimney serving
a separate solid fuel burning appliance. Each direct-
vent gas appliance must use a separate vent system.
Do not use common vent systems.
WARNING: Vent pipe air space clearances to com-
bustibles are 1" on all sides except on the horizontal
sections, which require 2" clearances from the top of
the pipe. Where the termination cap penetrates a com-
bustible wall, 1" air space clearance is required.
INSTALLATION PLANNING
There are two basic types of direct-vent installation:
• Horizontal Termination
• Vertical Termination
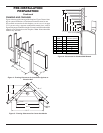
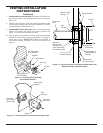
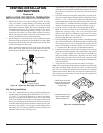
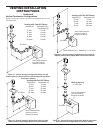
Horizontal Termination Installation
IMPORTANT: Horizontal square terminations require only in-
ner portion of wall restop. Horizontal installations using round
termination require exterior portion of wall restop (see Figure
14, page 10).
1. Set the replace in its desired location and determine the route
your horizontal venting will take. Do not secure the replace
until all venting has been installed. Some installations require
sliding the replace in and out of position to make nal venting
connections. Figures 14 through 18 on pages 10 and 11 show
different congurations for venting with horizontal termina-
tion that will help you decide which application best suits your
installation. Check to see if wall studs or roof rafters are in the
path of your desired venting route. If they are, you may want
to adjust the location of the replace.