Special offers from our partners!

Find Replacement BBQ Parts for 20,308 Models. Repair your BBQ today.

www.desatech.com
117541-01B 21
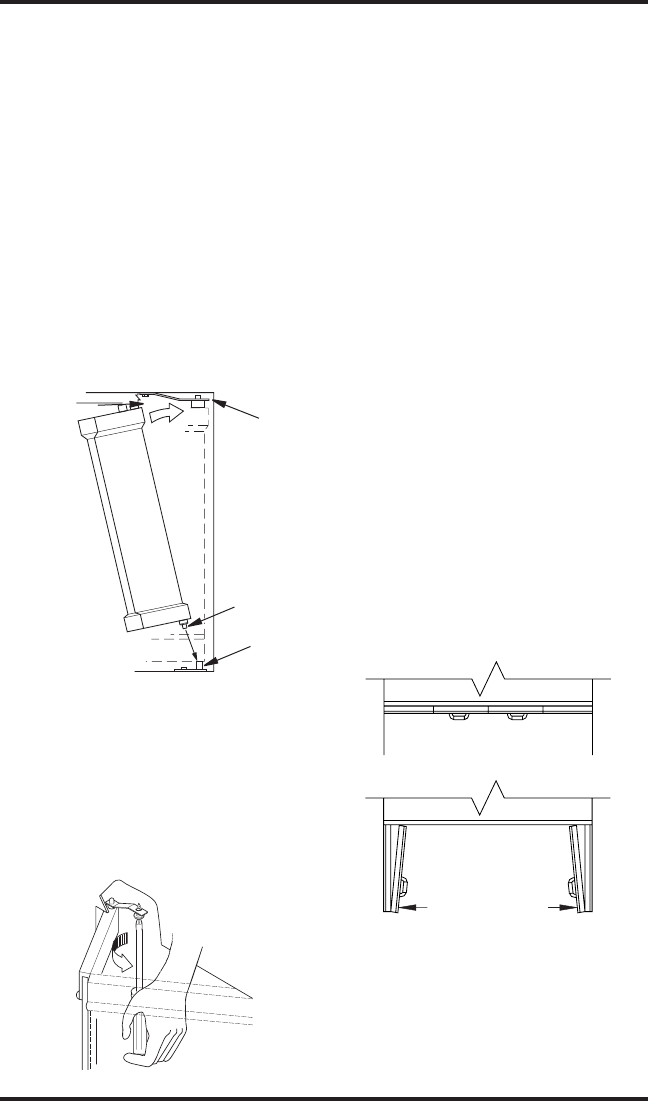
Figure 28 - Installing Bi-Fold Doors
Spring
Clip
Insert Pin
into Spring
Clip
Pivot
Hole
Insert
Bottom
Pivot Pin
into Hole
Fold Door
and Slide
Top Pins
Into Track
Figure 29 - Adjusting Bi-Fold Doors
Figure 30 - Bi-Fold Glass Doors
Doors Fully Closed
Fireplace Front
Doors
Fully Opened
Fireplace Front
OPERATION AND
MAINTENANCE
GUIDELINES
Glass doors are optional with the replace. When
fireplace is in operation, doors must be fully
opened or fully closed position only or a re hazard
may be created (see Figure 30).
A replace equipped with glass doors operates
much differently than a replace with an open
front. A replace with glass doors has a limited
amount of air for combustion.
Excessive heat within the replace can result if
too large a re is built or if combustion air gate is
not completely open. The following tips should
be followed to assure that both the replace and
glass door retain their beauty and function prop-
erly. Both the ue damper and glass doors must
be fully opened before starting re. This will
provide sufcient combustion air and maintain
safe temperatures in rebox.
IMPORTANT: The glass must be allowed to
warm slowly and evenly. The tempered glass will
withstand a gradual temperature rise to 550° F,
which is more than a normal re will generate.
Such materials as pitch/wax laden logs, very dry
mill end lumber and large amounts of paper or
cardboard boxes can create an excessively hot re
and should not be burned in this replace. Always
keep the re well back from the doors and never
allow ames to contact the glass.
GLASS DOOR
INSTALLATION
Continued
Spring clips have been installed but some adjust-
ments may be needed. Install the doors using the
following steps:
1. With bi-fold doors completely folded, insert
bottom pivot pin into pivot hole located near
bottom corner of front face opening and swing
door to vertical position making sure top pins
slide into door track. Door is installed when
top door pin snaps into spring clip.
2. Repeat step 1 for remaining door.
If you nd the doors do not close properly or do
not appear level or straight, proceed with section
on door adjustment,
Remove doors and slightly loosen lower pivot clips
and upper spring clips. Replace doors and fully
close them. Use 1/8" shims (any material) to level
doors. Once proper setting is achieved, carefully
open doors enough so that you can access spring
clips with a phillips screwdriver. Tighten screws.
See Figure 29.


