


Special offers from our partners!

Find Replacement BBQ Parts for 20,308 Models. Repair your BBQ today.
www.desatech.com
117541-01B14
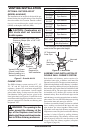
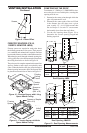
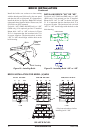
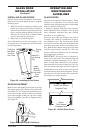
Install the bricks one section at a time starting
with the hearth panel followed by the rear panel
and then the left or right panel. It is important to
install the bricks in sequence. Note: The left and
right panels have identical bricks. Please note, full
size bricks are NOT stamped.
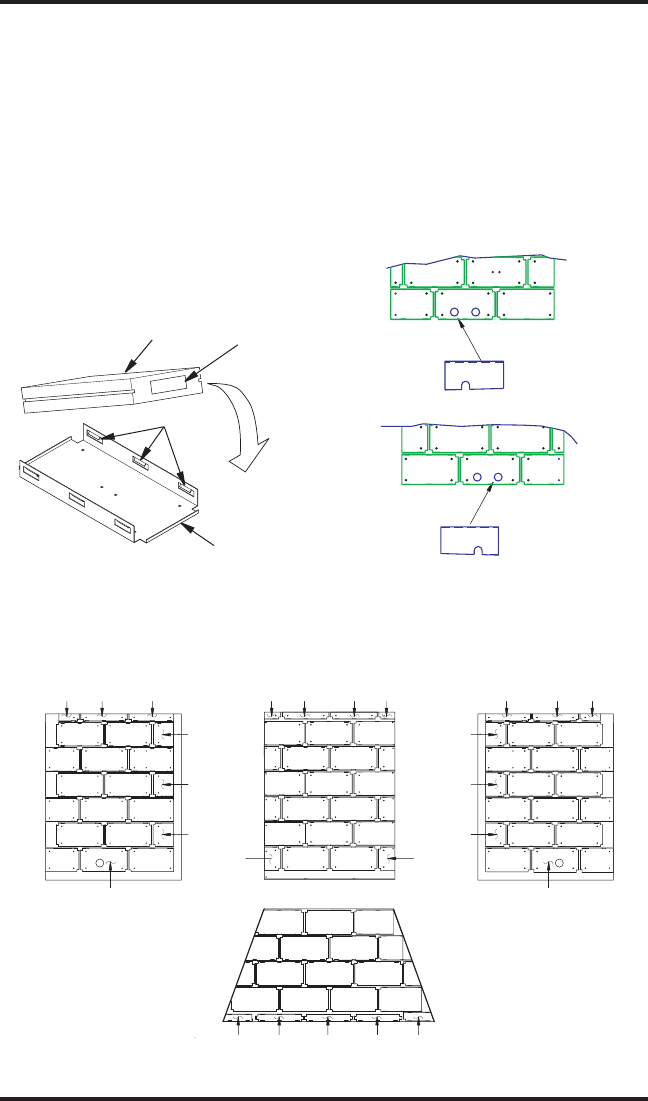
Use brick “AO” (JM42 and JM50 only) or “AR”
(JM36 only) if an optional gas line is installed.
Mount brick “AO” or “AR” as shown in Figure
20. It is important that the knockout hole is in
its proper locations. The knockout hole on brick
“AO” or “AR” should align with the hole on the
brick housing.
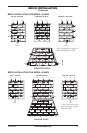
BRICK INSTALLATION
Continued
Figure 20 - Installing Brick
Brick
Stamped
Letter
Location
Brick Housing
Flanges
LEFT PANEL
REAR PANEL
RIGHT PANEL
HEARTH PANEL
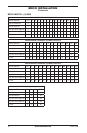
AH
Q
P
AG
AC
AE
AFFULL
AF
AF
AP
AC
AG
AT
AG
Q
AI
Q
AI
C
C
D
D
FULL
C
D
C
G
FULL FULL
G
FULLFULL
FULL FULL
FULL
HH
I
I
M
M
ABL
FULL
D
C
AS
C
FULL FULL
FULL
FULL FULL
FULL
AL AL
FULL
FULL
FULL
FULL
AE
AE
FULL
FULL
Q
AC
AE
AN
FULL
AC
AE
AE
FULL
FULL
AH
AG
AG
AF
AG
AF
AF
P
AB L L
AS
OR
**AR**AR
AP
OR
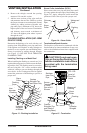
**See instruction above before
installing brick "AR"
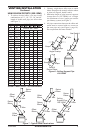
Use brick “AO” (JM42 and JM50 only) or “AR”
(JM36 only) if an optional gas line is installed.
Mount brick “AO” or “AR” as shown in Figure
21. It is important that the knockout hole is in
its proper location. The knockout hole on brick
“AO” or “AR” should align with the hole on the
brick housing.
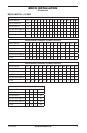
LEFT PANEL
D1510
FULLFULL
D
C
B
AN
RIGHT PANEL
B
C
AN
FULL
AO
FULL
D
OR
AR
AR
AO
OR
LEFT PANEL
D1510
FULLFULL
D
C
B
AN
RIGHT PANEL
B
C
AN
FULL
AO
FULL
D
OR
AR
AR
AO
OR
Figure 21 - Installing Brick “AO” or “AR”