


Special offers from our partners!

Find Replacement BBQ Parts for 20,308 Models. Repair your BBQ today.

www.desatech.com
117541-01B 13
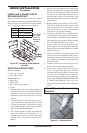
OPTIONAL GAS LINE
INSTALLATION
Continued
and connections must be tested
for leaks after the installation
is completed. After ensuring
that the gas valve is on, apply
soap and water solution to all
forming show a leak. Correct
-
-
-
ate an unvented gas log set in
removed.
If you install a decorative gas appliance (vented
gas log), the decorative gas appliance must comply
with the Standard for Decorative Gas Appliance
for Installation in Solid Fuel Burning Fireplaces,
ANS Z21.60, Z21.84 or RG 2-72 and shall also be
installed in accordance with the National Fuel Gas
Code, ANSI 7223NFPA 54 latest edition.
has been used for wood burning,
cleaned of soot, creosote and
cleaner. Creosote will ignite if
heavily heated.
decorative vented gas log, the
damper must be removed or
permanently locked in the fully
open position and the glass
doors must be in the fully open
position.
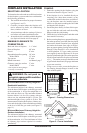
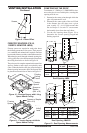
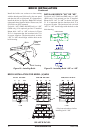
Figure 18 - Gas Line Knockout
Side
Firebrick
Finished
Side
Refractory
Knockout
Plug
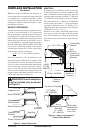
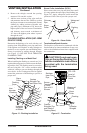
Outside of
Fireplace
Gas Line
Conduit
Insulation
Gas
Conduit
Cover
1/2" Dowel
Seal
Opening
with
Refractory
Cement
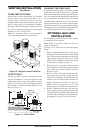
Outside of
Fireplace
Gas
Line
Conduit
Repack
Insulation
Incoming
1/2" Black
Iron Pipe
Side
Firebrick
Finished
Side
Provide Enough Threaded
End for Fitting Connection
Figure 19 - Gas Line Installation
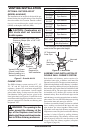
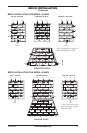
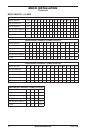
BRICK INSTALLATION
Installation of brick should be
in a permanent location.
The brick housing panels are already installed in
the rebox. Each housing is stamped with a letter
(full size bricks are not stamped). These letters will
help identify the brick when installing. It is impor-
tant to install these bricks exactly as instructed.
Press the brick rmly into the brick housing until
it snaps. The groove line on the side of the brick
will come in contact with the ange on the brick
housing. This secures the brick into the housing.
See Figure 20 on page 14.
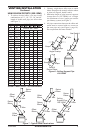
The bricks are packaged in four separate boxes.
These boxes are labeled by sections of the re-
box.
Box #1 - Hearth Panel
Box #2 - Rear Panel
Box #3 - Left or Right Panel
Box #4 - Left or Right Panel
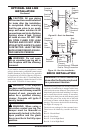
Remove
Knockout