


Special offers from our partners!

Find Replacement BBQ Parts for 20,308 Models. Repair your BBQ today.
www.desatech.com
112462-01B 11
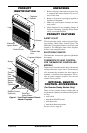
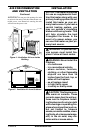
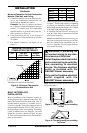
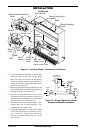
Minimum Clearances For Side Combustible
Material, Side Wall, and Ceiling
A. Clearances from the side of the fireplace cabi-
net to any combustible material and wall
should follow diagram in Figure 6.
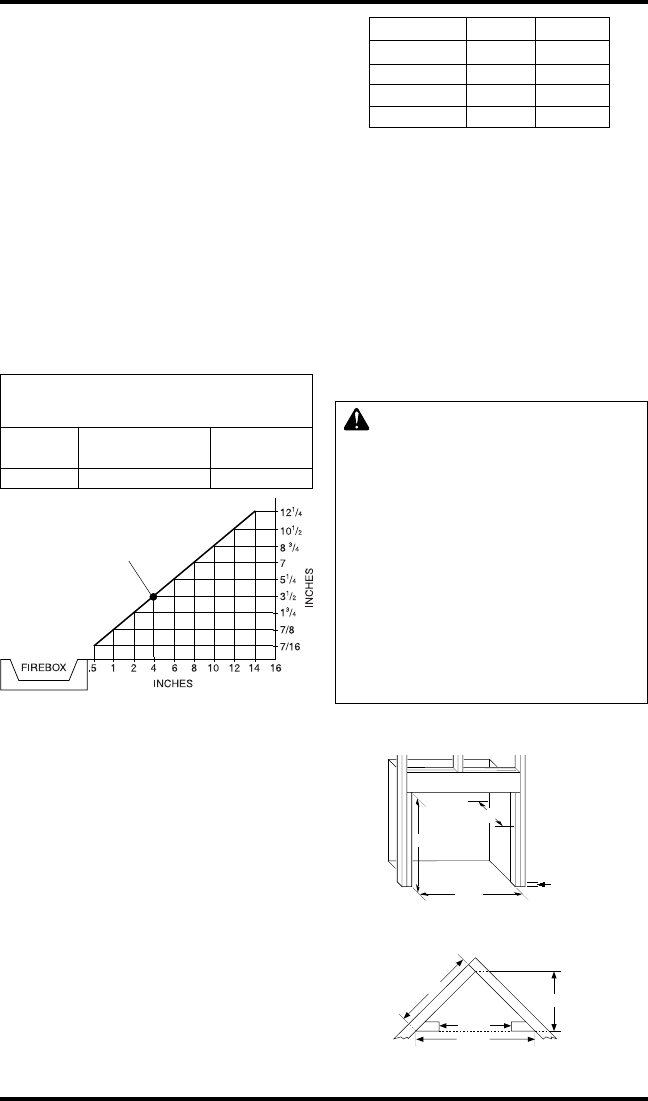
Example: The face of a mantel, bookshelf,
etc. is made of combustible material and pro-
trudes 3
1
/2" from the wall. This combustible
material must be 4" from the side of the fire-
place opening (see Figure 6).
B. Clearances from the top of the fireplace
opening to the ceiling should not be less than
36 inches.
C. For mantel clearances, see Figure 10 on
page 12.
Figure 6 - Minimum Clearance for
Combustible to Wall
*Minimum 16 inches from Side Wall
*
Example
MINIMUM CLEARANCE TO
COMBUSTIBLE MATERIALS
Top Left and Bottom
Right Sides and Rear
36" 6" 0"
INSTALLATION
Continued
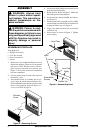
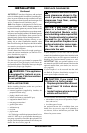
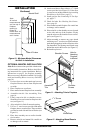
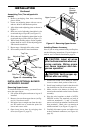
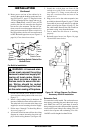
Actual Framing
Height 26" 26
7
/8"
Front Width 26
3
/4" 26
7
/8"
Depth 9
1
/2" 10
1
/2"
Bottom 3/4" 3/4"
1. Frame in rough opening. Use dimensions shown
in Figure 7 for the rough opening. If installing
in a corner, use dimensions shown in Figure 8
for the rough opening. The height is 26
7
/8" which
is the same as the wall opening above.
2. If installing GA3450T blower accessory, do
so at this time. Follow instructions included
with blower accessory.
Note:
If not installing blower accessory, you
may wish to run electrical wiring to your fire-
place for future blower installation (see Ac-
cessories, page 40). Use only approved three-
wire electrical wiring.
WARNING: If pre-wiring, do
not connect wiring to any elec-
trical source at this time.
Install fireplace electrical outlet
and connect wiring to outlet be-
fore connecting to electrical
source. The fireplace electrical
outlet is included with the
GA3450T blower accessory.
Only use the fireplace electrical
outlet supplied with the
GA3450T blower accessory.
Note:
A qualified installer should make all elec-
trical connections.
BUILT-IN FIREPLACE
INSTALLATION
Built-in installation of this fireplace involves in-
stalling fireplace into a framed-in enclosure. This
makes the front of fireplace flush with wall. An
optional trim kit accessory is available (see Ac-
cessories, page 40). Trim will extend past sides of
fireplace approximately 1/2 inch. This will cover
the rough edges of the wall opening. If installing
a built-in mantel above the fireplace, you must
follow the clearances shown in Figure 10, page
11. Follow the instructions below to install the fire-
place in this manner.
26
7
/
8
"
26
7
/
8
"
3/4" Off
The Floor
Minimum
10
1
/
2
"
Figure 8 - Rough Opening for Installing
in Corner
Figure 7 - Rough Opening for Installing
in Wall
36
5
/
8
"
25
7
/
8
"
51
3
/
4
"
26
7
/
8
"