


Special offers from our partners!

Find Replacement BBQ Parts for 20,308 Models. Repair your BBQ today.
www.desatech.com
111244-01E 19
OPTIONAL WIRELESS HAND-HELD
REMOTE CONTROL ACCESSORIES
Remote-Ready Models Only
([C]GHRCB Series & [C]GHRCTB
Series)
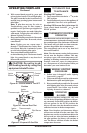
Installing Receiver
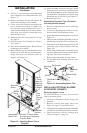
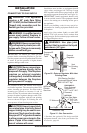
1. Disconnect wires from the control valve (see
Figure 27) .
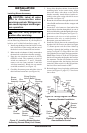
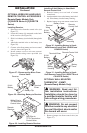
2. Locate the battery clip mounted on the back
of the receiver (see Figure 28).
3. Slide 9-volt battery (not included) through the
clip.
4. Attach the terminal wires to the battery (see
Figure 28).
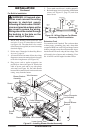
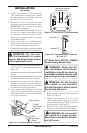
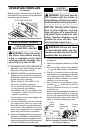
5. Connect wires from remote receiver to control
valve as shown in Figure 29.
6. Install remote receiver unit onto remote/
blower bracket using screws provided (see
Figure 29).
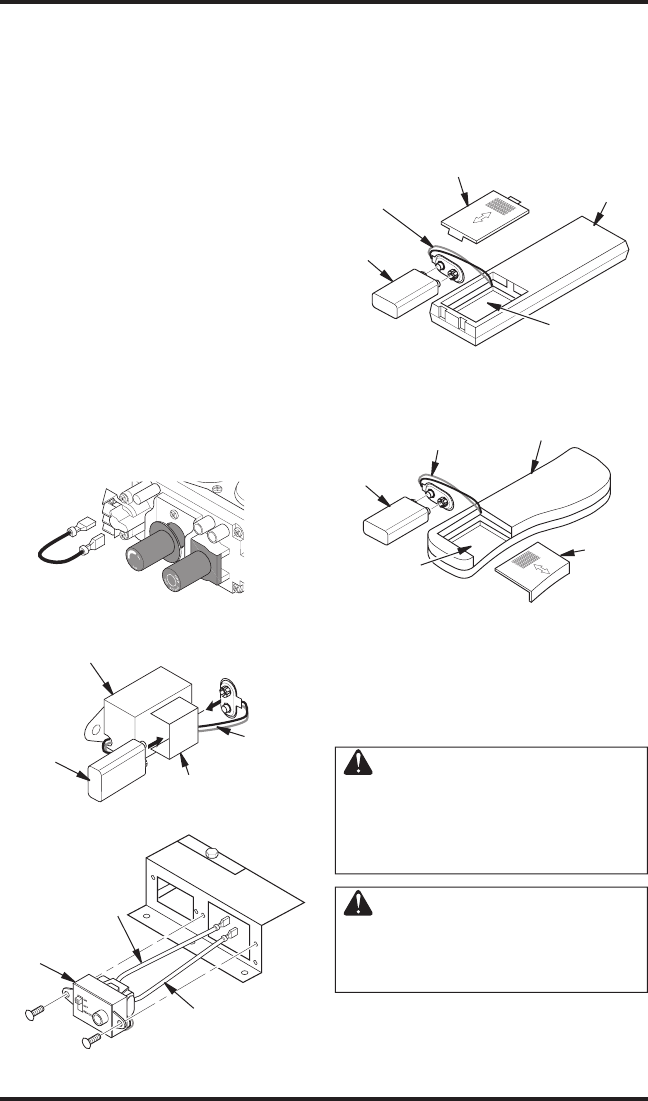
Installing 9-Volt Battery in Hand-Held
Remote Control Unit
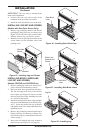
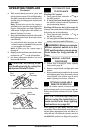
1. Remove battery cover on back of remote
control unit.
2.
Attach terminal wires to the battery (not includ-
ed). Place battery into the battery housing.
3.
Replace battery cover onto remote control unit.
INSTALLATION
Continued
Figure 27 - Disconnecting Wires From
Control Valve
Figure 28 - Attaching Battery to Receiver
Battery Clip
9-Volt
Battery
Receiver
Terminal
Wires
Figure 29 - Installing Remote Receiver
Remote
Receiver
White Wire to
TH Terminal on
Control Valve
Red Wire to
TPTH Terminal on
Control Valve
Figure 30 - Installing Battery in Hand-
Held Remote Control Unit (GHRCB and
CGHRCB Series)
Battery Cover
9-Volt
Battery
Terminal
Wires
Remote
Control Unit
Battery
Housing
Figure 31 - Installing Battery in Hand-
Held Remote Control Unit (GHRCTB and
CGHRCTB Series)
Remote Control Unit
Battery
Cover
Terminal Wires
9-Volt
Battery
Battery
Housing
OPTIONAL WALL MOUNTED
THERMOSTAT - GWMT1
(Remote-Ready Models Only)
WARNING: Read and fol-
low installation instructions.
Installation should be done by
a qualified installer familiar with
low-voltage wiring procedures.
WARNING: Do not connect
this thermostat to any electrical
source! Electrical shock and/or
fire hazard will occur.
1. Remove jumper wire from control valve (see
Figure 27).