


Special offers from our partners!

Find Replacement BBQ Parts for 20,308 Models. Repair your BBQ today.

Page 18
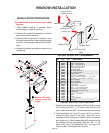
WINDOW INSTALLATION
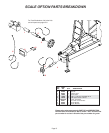
Window
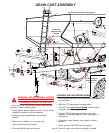
Grain Cart
Side
Locking Tab
Window
Gravity Box
Inside of Box
Locking Tab in
Closed Position
INSTALLATION PROCEDURE
The installation must be done from inside
the box.
1. Place rubber molding in opening. Seam
should begin on side of opening.
2. Remove the protective sheeting from both
sides of the plastic window.
3. Slide window into groove in molding. Use a
flat blade screwdriver to get molding seated
correctly. Using soapy water will aid in instal-
lation
4. Using the flat blade screwdriver, press in the
locking tab.
Rubber Seal
Inside of Box
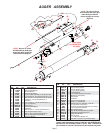
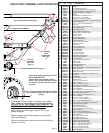
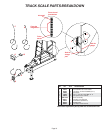
REF. PART
NO. NO. QTY. DESCRIPTION
1. 00059 2 3/8î Flatwasher
2. 00789 1 3/8î x 3/8î Set Screw
3. 00907 1 3/8î x 1 Hex Bolt (Gr.5)
4. 01113 1 Washer 2 OD x 3/8î ID
5. 01243-30 1 Roller Brace Bracket
6. 01332 1 Sprocket 50B9
7. 02026 1 20 Tooth Sprocket
8. 02028 1 10 Tooth Sprocket
9. 02592 3 3/8î Locknut
10. 02849 2 5/16î x 1-13/8î Roll Pin
11. 05363 1 Bushing 3/4îOD x 3/8îID x 1-11/16î long
12. 05364 1 Bushing 1-1/4î x 3/4îID x 1-5/8î long
13. 11525-30 1 Door Lift Mount
14. 10629-30 1 Door Lift Wheel
15. 10637-30 1 Door Lift Channel
16. 10620-30 1 Lower Door
17. 10644 1 Roller Chain (Not Shown)
18. 00523 2 3/8î x 1-1/4î Hex Bolt (Gr.5)
19. 04642 2 Grease Zerk (Not Shown)
20. 02166 1 3/8î x 2 3/4î Hex Bolt (Gr.5)
21. 02534 5 .75 Washer
22. 03096 2 1/4î x 1 1/4î Roll Pin
23. 10632 1 Shaft
24. 11412 1 Latch
25. 00004 2 5/16î Flatwasher
26. 11414 1 Bushing
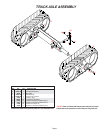
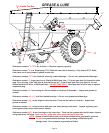
OUTER DOOR LIFT ASSEMBLY
21
14
15
22
22
7
2
1
9
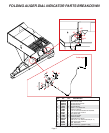
INSTALLATION PROCEDURE
1. Start by attaching the lower door (#16) to the lift channel
(#15) using two 3/8î x 1-1/4î bolts (#18) and two 3/8î
nylon insert locknuts (#9). Leave bolts loose at this time.
2. Next assemble the door lift mount (#13) as shown.
Leave the bolts loose at this time. After this is as-
sembled, slide the lower door and lift channel into place
on the grain cart. Slide the assembled lift mount over the
lift channel and bolt into place using two 3/8î x 1-1/4î
bolts (#18), two 3/8î flatwashers (#1), and two 3/8î
locknuts (#9). Now tighten all the bolts.
1
8
5
3
6
10
4
16
18
12
13
11
10
20
9
1
9
Refer to 5729 when
ordering a new door
opener
9
18
23
25
25
26
24