Special offers from our partners!

Find Replacement BBQ Parts for 20,308 Models. Repair your BBQ today.
18 NEUTON
®
GARDEN CART
Safety & Operating Instructions
Charging the battery is a simple process. Leave the battery in
your Cart when you charge it.
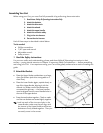
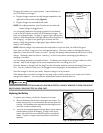
• Plug the charger connector into the charger receptacle on the
right side of the controls caddy (Figure 9).
• Plug the charger into a standard wall outlet.
NOTE: As a safety precaution, your Cart does not run when the
battery charger is plugged into it.
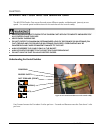
You can quickly determine the charging status of your battery.
Look at the LED display on the front of the battery charger. You
have one of display types. For type A, a green light indicates the
battery is fully charged and a red light indicates that the battery is
still charging. For type B, two green lights indicate that the
battery is fully charged and a single green light indicates that the
battery is still charging.
NOTE: With the charger only connected to the wall outlet or only to the Cart, the LED will be green.
Every time you finish using your Cart, recharge the battery. The time is takes to recharge the battery
depends on how drained it is when you start. Typically, the battery takes between 6 and 8 hours to fully
charge. The battery does not have a “memory”; so don’t worry about overcharging the battery or
charging it too often.
You can charge the battery hundreds of times. The battery lasts longer if you charge it before it is fully
drained. Keep it fully charged and at room temperature when not using your Cart.
Once the battery is charged, pull the plug from the wall outlet and then remove the charger from your
Cart. You can, however, leave your Cart plugged in and charging for an extended period of time.
Store the charger in the box you saved. Keep the charger in a dry location.
If the battery does not hold its charge for very long under normal conditions or it simply won’t hold a
charge, then replace it. You can purchase replacement batteries directly from us.
WHEN THE BATTERY GETS OLD AND NO LONGER ACCEPTS A CHARGE, REMOVE IT FROM YOUR CART.
NEVER LEAVE A DEAD BATTERY IN YOUR CART.
Replacing the Battery
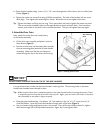
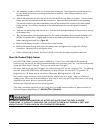
To replace your battery, tilt the Cart forward on its nose.
• Remove the battery door by first removing the two screws. The
battery door has a lip on one side which sets into the drive train
housing. Pull the battery door toward the bucket slightly as you
remove it in order to release the lip.
• Your Cart was originally shipped with two plastic zip tie straps to
hold the battery in place for shipping. Simply cut the zip tie
straps with a pair of scissors and pull them from around the
battery. They are no longer necessary and do not need to be
replaced.
Figure 9. Charging your Cart’s battery
First, plug in
the charger’s
connector
Then, plug
in to a
standard
wall outlet
Figure 10. Replacing the battery.


