


Special offers from our partners!

Find Replacement BBQ Parts for 20,308 Models. Repair your BBQ today.
CALL TOLL FREE 1-866-NEUTON1 15
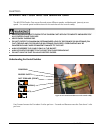
Screw
Washer
Lock Nut
Insert here
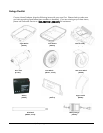
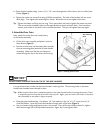
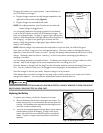
5. Attach the Upper Handle
Attach the upper handle onto the lower handles on
the bucket assembly.
• Slide the upper handle through the handle holes in
the upper bucket, and then over the lower handle
tubes on the bucket assembly. Make sure the
screw holes align.
• Tilt the Cart up on its nose. This makes it easier to
screw the handles together.
• Open the red hardware bag which includes only
two screws. Insert a 1/4" x 1-1/2" screw from the
outside of the handle, passing through the screw
hole where the upper and lower handles attach
(Figure 5).
• Once the screw is completely through the handle
assembly, place a 1/4" flat washer and then a 1/4" nylon lock nut on the inserted screw.
• Hold the screw with your Phillips screwdriver and tighten the nylon lock nut with a 7/16" open-end
wrench.
• Now attach the other side of the handle the same way.
• Lower the Cart back onto its wheels.
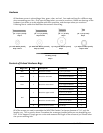
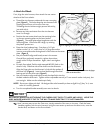
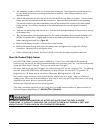
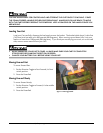
6. Attach the Controls Caddy
• The Power Pad on the controls caddy operates the
Cart.
• Open the red hardware bag with four screws. Place the
four 1/4" x 1-3/4" screws in the cup holder of the controls
caddy for easy access. Set the four small washers and
the nylon lock nuts in a handy spot where you can easily
reach them.
• Position the Controls Caddy on the upper handle, align
the holes on the caddy with the holes in the handle
(Figure 6), and hold the caddy firmly against the handle.
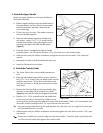
• Take the 1/4" x 1-3/4" screws from the cup holder and,
one by one, insert them into the holes. Make sure the
screws go all the way through the caddy and out the back of the handle. Slide a 1/4" small washer onto
the screws, and then loosely screw a 1/4" nylon lock nut onto the screws.
Tip: If you are having trouble attaching the small washers and nylon lock nuts, you might find it easier with
the Cart tilted forward on its nose.
• Hold the screw with your Phillips screwdriver and securely tighten the nylon lock nuts with a 7/16" open-
end wrench.
Tip: Be sure not to attach the controls caddy over the foam handle. If need be, push up the foam a bit
to fit the controls caddy flush against the metal handle.
Figure 5. Screw the upper handle onto the lower handles.
Figure 6. Securely attach the controls caddy to the
u
pp
er handle.
Screw and
Washer
Washer
Lock nut
Power pad