


Special offers from our partners!

Find Replacement BBQ Parts for 20,308 Models. Repair your BBQ today.

50004581
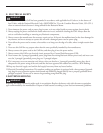
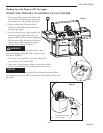
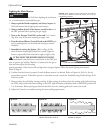
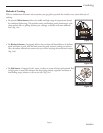
1. Retract the Sleeve on the Socket as shown in Figure 6a.
2. Insert Plug and release the Sleeve. (Fig. 6b)
3. Push the Plug until Sleeve snaps forward to lock the Plug in the
Socket.
1. Push Sleeve back and pull the Plug out.
• Never use Propane Gas in a Grill that has been configured to burn
Natural Gas, (and never use Natural Gas in a Grill that has been
configured to use Propane Gas), to avoid possible bodily injury. Always consult the Rating Label on the back of the
Grill to confirm that it has been configured to burn Natural Gas.
• Always utilitze a qualifed service agency to perform all required gas supply plumbing. In the U.S., the supply
connection must be made in accordance with local code or, in the absence of local codes, with the national fuel
gas codes, ANSI Z223.1/NFPA54. In Canada, the supply connection shall be carried out in accordance with the
provincial authorities having jurisdiction and in accordance with the requirements of the CSA 1-B149.1 installa
-
tion code.
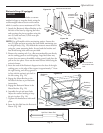
• A shutoff value must be installed between the gas grill and the main supply. For natural gas, use a 3/8” or 1/2”
natural gas supply line capable of an input of at least 100,000 BTUs (depending on the model).
• Always disconnect the Grill and close its individual manual shutoff valve, when conducting pressure tests of the gas
supply piping system at pressures which exceed 1/2 psi (3.5 kPa).
• Always isolate the Grill from the gas supply piping system by closing its individual manual shutoff valve
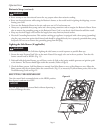
1. Always confirm that all burner control knobs are in the OFF position.
2. Always connect the gas supply hose first and then open the gas shutoff valve.
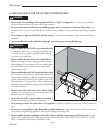
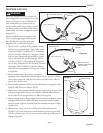
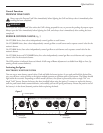
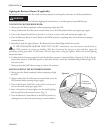
3. Always use a brush or spray bottle to apply a 50/50 solution of liquid soap and water to all connection points (as
illustrated in Figure 5) to test for gas leaks. Never use a match or open flame for that purpose.
4. Always look for bubbles to appear, as the appearance of bubbles will indicate a gas leak. Always turn off the gas im
-
mediately at the gas supply valve and tighten the connection, if you find that a leak exists.
5. Always repeat this procedure until no further gas leaks are found to exist, before lighting the Grill.
6. Never attempt to light this Grill, however, if a leak cannot be stopped. Always call your gas supplier promptly to
obtain assistance.
Page 5
Gas Hookup
Retract Sleeve
Release Sleeve
B127
sleeve connect
8/07
Figure 6a
Figure 6b
B127
WARNING