


Special offers from our partners!

Find Replacement BBQ Parts for 20,308 Models. Repair your BBQ today.

VCS4006 / VCS4106 / VCS5006 / VCS5016 Assembly
Page 4
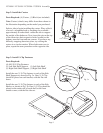
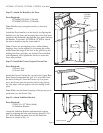
Step 6: Secure Shelves
Parts Required:
A.
B.
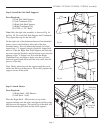
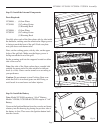
Step 7: Secure Side Shelf to Grill
Parts Required:
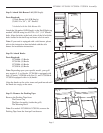
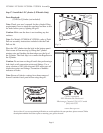
Step 8: Secure Condiment Tray to Console
Parts Required:
(4) 10-24 x 1/2” Bolts (black)
Secure each Shelf by inserting (2) 10-24 x 1/2” bolts
through the U-Clip fasteners as shown in the diagram.
Tighten the four (4) Shelf Support bolts from Step 4 to
secure the shelf supports to the grill body.
Repeat Steps5&6fortheopposite side of the grill.
(3) 10-24 x 1/2” Bolts (black)
Lift the grill lid and insert two (2) #10-24 x 1/2” bolts,
shown as “a” and “b” in Fig. 7, to further secure the
Shelf Right - S/B to the grill body. Be sure to fully
tighten the bolts before proceeding to the next step.
Next: Repeat Step 7 on the opposite side of the grill’s
interior to secure the Shelf Left - Solid to the grill body
by inserting only one (1) #10-24 x 1/2” bolt in the “b”
location as shown in the illustration.
(2) #10-24 x 1/2” Bolts (stainless)
(2) #10-24 Nuts (black)
Secure the Left Condiment Tray to the Console using a
#10-24 x 1/2” stainless bolt and a #10-24 nut. Make sure
the holes of the Condiment Tray and the Console are
aligned. Reach underneath the console and hold the nut
in place with one finger and insert the bolt from the
outside as shown in Fig. 8 and tighten until they are
securely fastened.
Next: Repeat Step 5 to secure the Right Condiment Tray
to the opposite side of the console.
A.
Insert
Bolts
B.
Tighten
Bolts
Fig. 6
Fig. 8
Bolt
Nut
Fig. 7
Bolt “a”
Bolt “b”