


Special offers from our partners!

Find Replacement BBQ Parts for 20,308 Models. Repair your BBQ today.

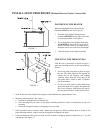
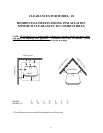
NOTE: DO NOT BLOCK ANY EXISTING LOUVERS OR VENT ON THE EXISTING
PREFAB WITH ANY TRIM PANELS FOR THE MODEL 18.
NOTE: If the Pre-Fab Zero Clearance Fireplace is not equipped
With HT-2100 degree UL Listed pipe, a UL-1777 Liner must be
Installed the the Full Length of the chimney, and attached to the
Flue Exit of the Insert.
NOTE: If the Pre-Fab Zero Clearance Fireplace is equipped with
HT-2100 degree UL Listed pipe, one of the two following methods
must be met:
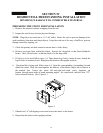
HEATER INSTALLATION
1. There are two listed and tested methods of installation of the Model 18 heater into a zero-
clearance or pre-fab fireplace.
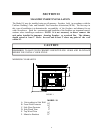
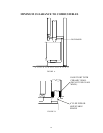
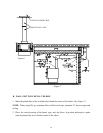
A. 6" Increaser
1. The preferred method is to use an increaser made of 24 gauge (minimum) stainless
steel to go from 6" inside diameter to exact diameter of the fireplace throat/chimney.
See Figure A.
2. Position the increaser into the throat/chimney of the Zero-Clearance Cabinet at a
height slightly higher than the Model 18 will be after installation. NOTE: The
increaser may be a two part slip connector type, if desired.
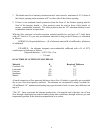
B. Ceramic Blanket
1. The second method is to use a 6" stainless steel connector (rigid or flex) and a
ceramic blanket (available from your dealer). See Figure B.
2. Cut the connector at least 18" long and tightly wrap the upper portion of the
connector with the ceramic blanket to almost the size of the fireplace throat/chimney.
3. Insert the connector into the fireplace throat/chimney and use additional ceramic
insulation and tightly pack around the connector and the throat/chimney at a height
slightly higher than the Model 18 will be after installation. NOTE: The increaser may
be a two part size connector type if desired.
12