


Special offers from our partners!

Find Replacement BBQ Parts for 20,308 Models. Repair your BBQ today.

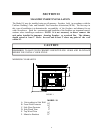
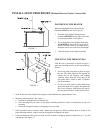
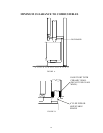
INSTALLATION PROCEDURE (Without Direct or Positive Connect Kit)
POSITIONING THE HEATER
When positioning the heater, the following
conditions MUST be met! (See Figure 2.)
1. The front of the damper opening must be
positioned BEHIND the rear edge of the lintel
to ensure proper draft. (See Figure 2.)
2. The vertical plane of the fireplace front must
fall BEHIND the side cold air vent on top of
the unit. (In other words, it is possible to have
the heater too far in as well as not far enough.)
3. Center the heater in the fireplace opening.
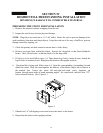
MOUNTING THE TRIM PANELS
After the unit is positioned, as shown in Figure 2,
mark the mounting position of the trim panels as
follows:
1. Set the top (long) trim panel in place on top of
the unit. The panel should be flat against the
outside face of the fireplace, and standing
vertically. Mark along the lower edge of the
trim panel with a pencil to make a reference
line for mounting.
2. Set the side trim panels in place behind and
against the intake covers, again, flat against the
face of the fireplace. Mark down the edge of
the trim panel to make a vertical reference line.
3. Slide the unit out of the fireplace far enough to work behind the trim panel reference lines.
4. Mount the side trim panels. (See Figure 3.)
a. Position the trim panel on the reference line.
b. Drill mounting holes in center of trim panels mounting brackets to allow for adjustment in and out if
necessary.
c. Mount the trim panel using the self-tapping screws provided.
5. Place top panel back on reference mark. Mount top trim panel by drilling mounting holes in center of trim
panel mounting brackets, with top end side of top panel overlapping side panel.
6. Using insulation provided, peel and stick to back of panels overlapping fireplace dimensions by 1" on each
side and top. (See Figure 3.)
FIGURE 2
FIGURE 3
8