


Special offers from our partners!

Find Replacement BBQ Parts for 20,308 Models. Repair your BBQ today.

7
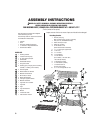
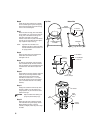
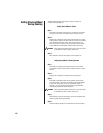
Step 18
Fasten the four shelf brackets to the
outside front of the cooking chamber and
four grill support brackets to the inside
using 4" x w" bolts, washers and nuts as
illustrated.
Step 19
Attach the two grill support brackets to
inside front of firebox using 4" x w"
bolts, washers and nuts.
Step 20
Insert the four 4" x 12" grill support
bolts into the pre-drilled holes in the back
of the cooking chamber and secure with
nuts.
Step 21
Insert the two 4" x 12" grill support bolts
into the pre-drilled holes in the back of
firebox and secure with nuts.
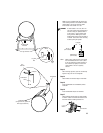
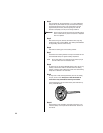
Step 22
Take one wooden shelf slat and align
holes with shelf bracket holes and attach
with
3
⁄16" x 12" carriage bolts and nuts.
Repeat this procedure with the other two
wooden shelf slats.
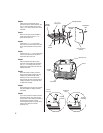
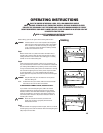
Step 23
Place heat shield in bottom of firebox.
Place a charcoal grate (smaller than the
cooking grills) above the heat shield
allowing it to rest on the sides of the
firebox. Place the other charcoal grates in
cooking chamber to use as another level
for food when smoking.
Step 24
Place cooking grills on top of grill support
bolts and brackets in cooking chamber
and firebox.
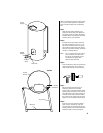
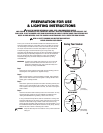
Step 25
If you have purchased a smoker without a
temperature gauge, insert chrome push
plug into hole in lid of cooking chamber. If
the temperature gauge is included,
remove tightening ring from gauge. Drop
probe through hole and re-thread
tightening ring.
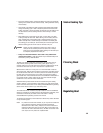
Cooking
Chamber
Cooking
Chamber
Chrome
Push Plug
Temperature
Gauge
Cooking Chamber
Grill Support
Bracket
Grill Support
Bolt
Wooden
Shelf Slat
3
⁄16" x 12"
Carriage Bolt
Shelf
Bracket
Inside of Cooking
Chamber
Firebox
Charcoal
Grate
Heat Shield
Warming Tray