


Special offers from our partners!

Find Replacement BBQ Parts for 20,308 Models. Repair your BBQ today.

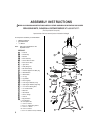
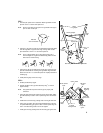
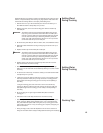
STEP 5:
a. Turn burner assembly over in base pan.
Insert the end of brass extension tube
(that extends inside the base pan) into the
head of burner mixer tube.
b. Position burner assembly in center of
base pan and push tab on bottom of
burner bracket through slot in bottom of
base pan.
c. Install the hitch pin through the hole in
the tab on the underside of base pan. This
will hold the burner assembly in place.
IMPORTANT: The burner mixer tube head
must remain sleeved over the
brass extension tube. Visually
inspect the installation by
looking into the air opening
on the side of the burner
mixer tube head. When
properly installed, the end of
the brass extension tube can
be seen inside the mixer tube.
NOTE: The air opening in the mixer tube
head must not be obstructed in any
manner. Check periodically and
clean grease and other substances
from burner mixer tube head to
allow proper airflow.
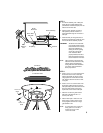
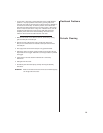
STEP 6:
a. Insert a 10-24 x 12" screw in each of the
three lower holes on side of base pan
directly above each leg. Secure screws
using square nuts on the inside of base
pan. These screws will hold the 15" lava
rock grate.
b. Insert a 10-24 x w" screw in each of the
three holes located near the top edge of
base pan directly above the screws for the
lava rock grate. Secure screws using
square nuts on the inside of base pan.
c. Place the 15" lava rock grate inside of
base pan on the three 10-24 x 12"
screws (lower level).
d. Place an even layer of lava rocks over
entire surface of grate. Position rocks
closely together so there are no large
gaps between rocks.
NOTE: To convert this unit to a gas grill,
simply place a 152" chrome
cooking grill on top of the
10-24 x w" screws.
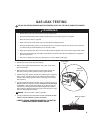
Air Opening
Hitch Pin
Burner Assembly
Burner Mixer
Tube Head
Burner
Mixer Tube
Brass
Extension
Tube
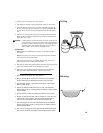
Lava Rocks
15" Lava Rock Grate
Square Nuts
10-24 x w"
Screw
10-24 x 12"
Screw
6