


Special offers from our partners!

Find Replacement BBQ Parts for 20,308 Models. Repair your BBQ today.
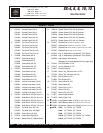
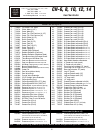
III. TROUBLE SHOOTING GUIDE
CAUTION: Take extreme care to assure that, if a valve is opened, a flame is present. If a valve is left open
without a flame, turn the valve off and wait at least five minutes before attempting to (re)light. Service should
be performed only by a qualified gas technician.
1. BURNER FLAME ADJUSTMENT:
(a) The burner flame should be as blue as possible. However, there will be traces of orange and/or yellow
from particles in the air burning in the flame. Slight yellow tips at the flame ends are acceptable.
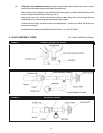
(b) If the flame appears yellow, loosen the air-mixer cap hold down screw “A” (see figs. 2 and 3). Rotate
the air mixer cap counter-clockwise to allow more air into the burner, until the flame turns blue.
Tighten the screw.
2. PILOT FLAME ADJUSTMENT:
The pilot flame can be adjusted by turning the appropriate adjusting screw using a screwdriver or a 3/16
wrench (see fig. 2), counter-clockwise to increase, clockwise to decrease and close. The pliot flame should be
about ½ inch long.
3. LACK OF HEAT:
Check to see if the pilot flames are on. If they are on but the burners do not light, or the burner flames look
weak, then there is a possibility of a gas pressure loss to the broiler.
(a) Check that the unit's main valve is fully open. Normally in the open position, the valve handle will be
parallel to the piping. The valve should be located somewhere on the gas line feeding the char-
broiler. If the handle is NOT parallel to the piping, the unit is not getting the gas supply required to
operate properly. Turn the valve handle parallel to the gas supply line.
(b) If there is a problem with the gas supply, it may be checked fairly easily. Turn off half of the burners or
turn off all other gas appliances and see if the broiler flames increase. If there is an increase in the
flame height then there is a problem with the gas supply. A problem with the gas supply requires
immediate attention. IMMEDIATELY close all the burner valves (turn to the off position), including
the char-broiler's main valve. Contact a qualified service agency or the public gas company.
The following should be checked:
1. The building's main pressure regulator.
2. The size of the broiler's gas supply line (if it is a new installation).
3. The broiler's pressure regulator.
4. The orifice size of each burner.
4. ONE BURNER FAILS TO LIGHT:
NOTE: Always make sure that grates, radiants and burners are cold before handling.
(a) Check to see that the on/off valve to that burner is on.
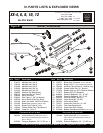
(b) Check to see if the pilot flame is lit. Each burner has its own pilot, which is located on the manifold
along the front of the char-broiler (see fig. 2).
If the pilot is not lit, attempt to light it using a long taper. If it fails to light, turn off all the burners, allow
to cool and then remove the top grate and the radiant over the burner. With a thin wire or pin, check
that the hole is clear at the top of the pilot tube. Attempt to relight using a taper.
(c) If the pilot burner is lit, close all the burner valves, allow to cool and then remove the top grate and
the radiant over the burner, and check that the pilot flame is located over the first few holes in the
burner. The pilot tube can be bent slightly to reposition the flame.
9