


Special offers from our partners!

Find Replacement BBQ Parts for 20,308 Models. Repair your BBQ today.

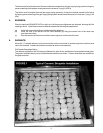
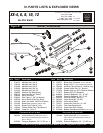
7. TOP GRATES:
Place a grate over each of the radiants. For normal operation, the pointed side of the grate is facing up. For
use with foods that require extra support, the flat side may be used.
On XX Models, grates can be placed on three levels; two positions are built into the rear of the unit; the third
position requires a special adapter. On CH models, three positions are already built into the rear of the unit.
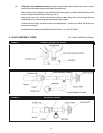
8. LIGHTING:
Each burner on the base char broiler has a standing pilot burner that must be lit before the burners can be lit.
To light the pilot burners:
(a) Turn all broiler valves to the off position.
(b) Remove each top grate and radiant.
(c) Open main gas SHUT-OFF valve (supplied by customer).
(d) Allow air to bleed from the gas line through the pilot burners.
(e) Light the pilot burners using a lit taper.
(f) Turn the burner control valves “ON” to light the burners.
(g) If any burner fails to light, turn the burner valves to “OFF”, wait five minutes and repeat the above
procedure.
(h) After all burners have been ignited properly, turn each burner valve “OFF” and allow the unit to cool.
NOTE: Make sure that the pilot burners stay lit.
(i) Replace radiants and top grates.
(j) Each burner may now be adjusted to the desired flame size by turning the individual burner valve
handle.
(k) To shut down the unit, turn all valves “OFF”
Wait five minutes before attempting to re-light.
NOTE: The pilot burners will stay lit until the gas supply to the unit is turned “OFF”.
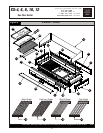
9. GRIDDLE PLATE:
Griddle plates should not cover more than 50% of the BROILING area. Each Griddle Plate fits on top of two grates
(one 4 1/2” and one 6”). It is not necessary to remove the top grates and radiants before installing the griddle plate.
10. ADDITIONAL INSTALLATION INSTRUCTIONS
(a) Keep the area around the broiler free and clear of combustible materials.
(b) The provision of an adequate air supply to your broiler is essential. Provide for sufficient outside
air to enter the broiling area and assure that this airflow is not obstructed.
(c) Air enters the burner area from the front and bottom of your broiler. Assure that these areas are kept
open and unobstructed.
(d) Servicing is accomplished through the front and top of the broiler. Assure that these areas are kept
unobstructed for proper servicing and operation.
11. INSTALLATION WITH CASTERS
(a) Install the casters with the wheel brakes on the front of the appliance.
(b) Installation should be made with a connector that complies with the latest edition of the Standard for
Connectors for Movable Gas Appliances, ANSI Z21.69 in the USA (CAN/CGA-6.16 in Canada), and a
quick disconnect device that complies with the latest edition of the Standard for Quick Disconnect
Devices for use with gas fuel, ANSI Z21.41 in USA (CAN 1-6.7 in Canada) and adequate means must
be provided to limit the movement of the appliance without depending upon the connector and any
quick disconnect device or its associated piping to limit the appliance movement.
(c) The restraint should be attached to the legs on which the casters are mounted.
(d) If disconnection of the restraint is necessary, the restraint should be reconnected after the appliance
has been returned to its originally installed position.
6