


Special offers from our partners!

Find Replacement BBQ Parts for 20,308 Models. Repair your BBQ today.

18
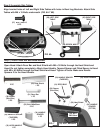
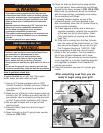
1) Remove Drip Cup, Cooking Grid, and Flame Diffuser.
2) Drip Cup-Wash the Drip Cup with soap and water.
3) Grill Body and Cart-Remove excess grease and/or fat
with a soft plastic or wooden scraper. Do not use steel
wool or other abrasive cleaners that can scratch painted
or porcelain coated surfaces. It is not necessary to remove
all the grease from the body. Wipe it down with paper
towels or soft damp cloth.
4) Warming Rack-Clean if necessary with soap and water.
5) Cooking Grid/Flame Diffuser. Clean the residue off
with hot soap and water, or baking soda. For stubborn
stains, use a non-abrasive scouring powder. Do not use
steel wool or other abrasive cleaners that can scratch the
porcelain coated surfaces.
This can cause foods to stick on
the Cooking Grids.
6) All other Cleaning-For further cleaning, use hot soapy
water and a cloth, or nylon-bristled brush only. Do not
immerse the gas controls or manifold in water. (Avoid
getting water in the Burner Holes.)
7) Burner-Burning off the residue after cooking will keep the
burner clean with normal usage, provided the Burner
is operating correctly. Clean the the Burner annually,
or whenever heavy build-up is found, to ensure that there
are no signs of blockage (debris, insects) in either the
burner portholes, the primary air inlet, or the neck of the
burner. (See Burner Cleaning instructions.)
8) After cleaning, replace all the cleaned parts. Re-tighten
Burner and Heat Shield screws.
CARE AND MAINTENANCE
CLEANING THE GRILL
To reduce the risk of a cut injury:
· Be careful or wear protective gloves when cleaning grill
parts that have sharp edges.
To reduce the risk of a fire beneath the grill:
· Inspect and clean burner/venturi tubes for insects and
insect nests.
· Be sure burners are re-installed properly before using
grill.
· Inspect burners periodically, if large cracks or holes are
found, replace the Burner.
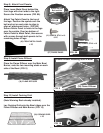
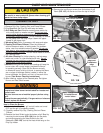
How to Clean the Burner:
1) Make sure the LP cylinder grill control knobs are turned
OFF and the grill is completely cooled.
2) Carefully remove Drip Cup, Cooking Grid and Flame
Diffuser.
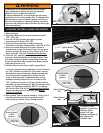
3) Remove the Heat Shield under the bottom of grill Bowl by
removing the two screws (FIG. 15A) then the two bolts
and wingnuts securing the Heat Shield to the Left
Sidebrace. (FIG. 15B) Just let the Heat shield hang on the
Drip Cup holder.
FIG. 15B
Wingnuts
Heat Shield
edge over
Crossbrace
edge
Screws
Heat Shield
Valve nozzles must
fit inside Burner
venturi tubes .
Burner Screw
Heat Shield Screws
FIG. 15A
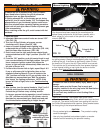
FIG. 15C
Heat Shield
4) Remove the two Burner screws from the bottom of grill
Bowl. (FIG. 15C) Lift Burner out from the top of the grill.