


Special offers from our partners!

Find Replacement BBQ Parts for 20,308 Models. Repair your BBQ today.

14
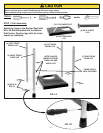
To reduce the risk of serious bodily injury or death:
· This outdoor cooking appliance shall be used only
outdoors and shall not be used in a building, garage,
or any other enclosed area. Locate outdoor cooking
appliance in an area with good ventilation on a level
stable surface clear of combustible and flammable
material.
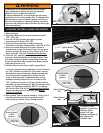
· Maintain minimum clearances of 36” from back and
sides of grill to any combustible construction.
· Do not locate this appliance under overhead
unprotected combustible construction.
· This outdoor cooking appliance is not intended to be
used in or on boats or installed in or on recreational
vehicles.
· Do not use gas grill as a space heater.
SELECTING A LOCATION
PERFORMING A LEAK TEST
To reduce the risk of serious bodily injury or death:
· Perform a leak test before each use and each time a
gas connection or disconnection is done .
· Perform a leak test in a well ventilated area.
· Never use an open flame to test for gas leaks.
· Never smoke near the grill during a leak test.
· Do not perform a leak test on a grill while it is hot or in
use.
· Do not use the gas grill if you detect a gas leak that
cannot be corrected by using the leak test procedures.
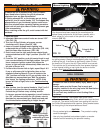
How to perform a leak test:
Supplies Needed for a Leak Test: Clean paint
brush, water, and dish washing liquid.
1) Use an LP Cylinder equipped with an OPD
(Overfill Prevention Device) and have it filled at
an authorized LP gas dealer by a qualified
attendant.
2) Make sure all of the grill control panel knobs are
turned to the “off” position and verify that the LP
gas cylinder valve is closed by turning the knob
on the LP gas cylinder clockwise until it stops.
3) Mix one part of water with one part of dish
washing liquid.
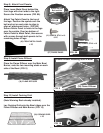
4) Remove Fabric Panel from the front legs if
necessary.
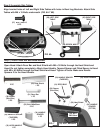
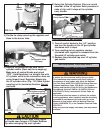
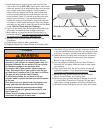
5) Open the knob on the LP gas cylinder counter-
clockwise. (FIG. 12A)
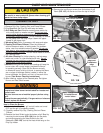
6) Check for leaks by brushing the soap solution
on all gas valves, hose connections and fittings.
(shown by the heavy arrows in (FIG. 12A & 12B)
Make sure you generously brush the locations
with the soap solution, completely surrounding
the connections and fittings.
7) If “growing” bubbles appear on any of the
connection points, you have detected a gas
leak. Immediately close the LP cylinder valve by
turning handle clockwise.
A) If leak appears at either end of hose and
regulator assembly, retighten the connection
at the leak, but do not over tighten. (Note:
Only hand tighten at coupling nut) Repeat
Leak Test.
B) If the leak is coming from the Gas Cylinder,
from the valves at the control knobs, or if the
leak cannot be stopped, do not use the grill.
Call Customer Service at 1-800-251-7558.
8) Upon completion of leak test, turn all control
knobs to the “off” position. Turn the handle on
the LP gas cylinder clockwise until it stops.
Disconnect LP gas cylinder by turning coupling
nut on regulator in a counter clockwise direction
until regulator is released from threaded LP
cylinder gas nozzle.
9) Place the protective cap over LP cylinder gas
nozzle.
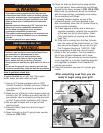
After completing Leak Test, you are
ready to begin using your grill!
Turn LP Gas Cylinder valve counter-clockwise.
FIG. 12A
Gas Manifold Fittings
FIG. 12B
Regulator Seal
Regulator
Coupling Nut
Hose Fittings