


Special offers from our partners!

Find Replacement BBQ Parts for 20,308 Models. Repair your BBQ today.

15
3. Before each use of the appliance make sure that the thermometer is properly calibrated by
placing the tip in a pot of boiling water. The thermometer should register within +/-20˚ of 212˚F or
+/-10˚ of 100˚C. If the thermometer is miscalibrated, contact Metal Fusion, Inc. to obtain a
replacement before using the appliance.
4. Hang the thermometer on the inside of the pot with the probe immersed in the cooking liquid.
Never place a lid over a pot when monitoring the temperature of oil.
5. Once the fire has been lit monitor the temperature on the thermometer at all times. Water boils
at 212˚F. The temperature of hot oil should never be allowed to exceed 350˚F.
IMPORTANT: Oil can ignite at high temperatures. Most King Kooker
®
thermometers have a Red
Zone above 350˚F to signify Danger. Never allow the temperature to exceed 350˚F. If the
temperature goes above 350˚F immediately turn the burner and gas supply OFF and wait for the
temperature to decrease to below 350˚F before relighting according to instructions in the manual.
If at any point during the cooking process the oil begins to smoke, immediately turn the burner
and gas supply OFF regardless of the reading on the thermometer. Allow time for the oil to cool,
then contact Metal Fusion, Inc. for further instructions.
6. When the cooking is complete and the cooker has been turned off, allow the temperature of the
oil to fall below 100˚F before moving the pot, cooking oil, or cooker.
7. Please call Metal Fusion, Inc. at (800) 783-3885 with any questions concerning the use or
operation of the thermometer.
LIGHTING INSTRUCTIONS
THE COOKER MUST NOT BE LIT UNTIL THE PRECEDING
PLACEMENT INSTRUCTIONS HAVE BEEN COMPLETELY FOLLOWED.
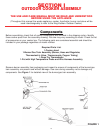
(ILLUSTRATIONS PAGE 16)
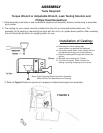
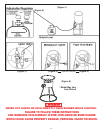
1. Check the appliance to make sure it is set up as per the illustration (Figure 1).
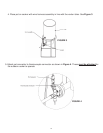
2. Make certain that the regulator control is turned to OFF by turning it counterclockwise until it
reaches the stop (Figure 2).
3. Open cylinder control valve by turning it counterclockwise as per the diagram (Figure 2).
4. Turn the regulator control toward the “ON” position. Press and hold down the valve igniter button
to start the flow of gas as per Figure 3. Insert a multi-purpose lighter through the hole in the
shroud as per Figure 4, or use a paperbook match as per Figure 5. Turning the regulator control
clockwise increases the gas pressure to the burner and hence the flame size. See Figure 2.
Continue to press down on the igniter button upon ignition for approximately 10 to 20 seconds
and then release the igniter button. The burner should remain lit. If ignition does not continue
(flame goes out) or fails to ignite, wait 5 minutes then repeat lighting procedure. If burner still does
not remain lit, check connectors and try again. If burner can not be successfully lit call Metal
Fusion, Inc. at (800)783-3885 (7:30AM to 3:30PM CST, Mon.-Fri.) for assistance.
5. Check that the flame is blue and that the flames are emitted from every port in the casting. If not,
rotate the air shutter position until there is a blue flame. Opening the shutter too much will cause
the flame to “Lift” off the burner (Figure 6).
If there is a yellow flame, or if some ports have no flame, this indicates there may be an
obstruction in the venturi tube or ports. Check the Maintenance Instructions on pages 18-19 for
more information regarding a yellow flame.