


Special offers from our partners!

Find Replacement BBQ Parts for 20,308 Models. Repair your BBQ today.

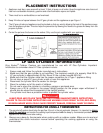
CONNECTION INSTRUCTIONS
1. Check that your 20 lb. LP gas cylinder is not over-filled. The maximum weight of a properly filled
cylinder is approximately 38 lbs.
2. Verify that the cylinder valve has the proper connection for a Type 1 Connection.
3. Check that your hose assembly is set to not allow gas flow. If you have an adjustable regulator,
turn the regulator control counterclockwise until it stops. This is the OFF position. If you have a
non-adjustable regulator with manual valve(s), turn the manual valve(s) clockwise until it stops.
This is the OFF position.
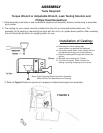
4. Attach the regulator to the cylinder valve by turning the Type 1 fitting clockwise. Hand tighten with
the regulator positioned upright.
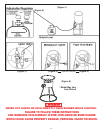
5. Perform the Leak Test:
LEAK TEST
Before lighting the appliance, a thorough leak test must be satisfactorily completed using a
non-ammonia soapy water solution (50% non-ammonia soap and 50% water). This is to be
applied with a small brush to all gas joints after the cylinder valve is opened (no more than 1/2
turn). If bubbles are seen, indicating a leak, turn off the cylinder and tighten the leaking connection
until a further leak test shows no leaks.
If tightening the connection does not stop the leak, call Metal Fusion, Inc. (800) 783-3885, for
assistance.
DO NOT USE UNTIL REPAIRS ARE MADE
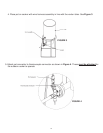
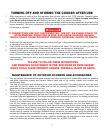
6. Before lighting the cooker, check that the venturi tube is free of obstruction and that the orifice is
properly threaded into the venturi tube as per instructions on pages 10-11. Both situations must
be corrected if necessary before lighting to prevent flashback.
13
SECTION II
USE AND CARE
(Throughout this manual the words appliance, cooker, fryer/boiler, burner and stove will be used
interchangeably to refer to the King Kooker
®
Outdoor Cooker.)