


Special offers from our partners!

Find Replacement BBQ Parts for 20,308 Models. Repair your BBQ today.
Buy Weber Grill Parts. It couldn't be easier. Find your Weber parts here.

7
WWW.WEbEr.com
®
7
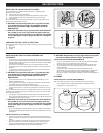
IMPORTANT LP CYLINDER INFORMATION
m DANGER
m NEVER store a spare LP Cylinder under or near Weber
®
gas appliances.
m NEVER fill the tank beyond 80% full.
m Failure to follow these statements exactly may result in a
fire causing death or serious injury.
The proper filling methods for the filling of your cylinder are by weight or volume, as
described in NFPA 58. Please make sure your filling station fills your LP cylinder by
weight or volume. Ask your filling station to read purging and filling instructions on the LP
cylinder before attempting to fill.
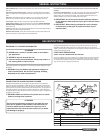
LEAK CHECK PREPARATION
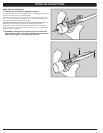
CHECK THAT ALL BURNER VALVES ARE OFF
Valves are shipped in the “OFF” position, but you should check to be sure that they are
turned off. Check by pushing down and turning clockwise. If they do not turn, they are
off. Proceed to the next step. If they do turn continue turning them clockwise until they
stop, then they are off. Proceed to the next step.
Weber
®
gas appliances are equipped for a cylinder supply system designed for vapor
withdrawal.
m WARNING: Only use Weber
®
gas appliances outdoors in
a well-ventilated area. Do not use in a garage, building,
breezeway or any other enclosed area.
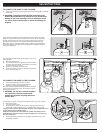
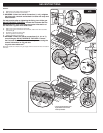
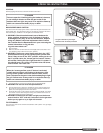
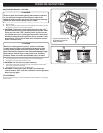
CONNECTING THE LIQUID PROPANE CYLINDER
All Weber
®
liquid propane gas grill regulators are equipped with a UL-Listed tank
connection as per the latest edition of ANSI Z21.58. This will require a liquid propane
tank that is similarly equipped with a Type 1 connection in the tank valve. This Type 1
coupling allows you to make a fast and totally safe hookup between your gas grill and
your liquid propane tank. It eliminates the chance of leaks due to a POL fitting that is
not properly tightened. Gas will not flow from the tank unless the Type 1 coupling is fully
engaged into the coupling.
m WARNING: Make sure that the LP cylinder valve is closed.
Close by turning valve clockwise.
m DANGER
Do not use an open flame to check for gas leaks. Be sure
there are no sparks or open flames in the area while you
check for leaks. Sparks or flames will result in a fire or
explosion which can cause serious bodily injury or death,
and damage to property.
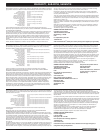
3
1
2 4
5
3
1
2 4
5
TYPE 1 CONNECTIVE COUPLING
1 Type 1 Valve
2 Hand Wheel
3 External Thread
4 Thermally Sensitive Nut
5 Propane Regulator
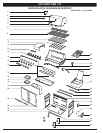
Slide out Bottom tray - Remove excess grease, then wash with warm soapy water,
then rinse.
Flavorizer
®
bars and Cooking grates - Clean with a suitable stainless steel bristle
brush. As needed, remove from grill and wash with warm soapy water, then rinse with
water.
Catch pan - Disposable foil trays are available, or you can line the catch pan with
aluminum foil. To clean the catch pan, wash with warm soapy water, then rinse.
Thermometer - Wipe with warm soapy water; clean with plastic scrub ball.
Inside cooking module - Brush any debris off of burner tubes. DO NOT ENLARGE
BURNER PORTS (OPENINGS). Wash inside of cooking box with warm soapy water
and a water rinse.
Inside Lid - While lid is warm, wipe inside with paper towel to prevent grease build-up.
Flaking built-up grease resembles paint flakes.
Stainless steel surfaces - Wash with a soft cloth and a soap and water solution. Be
careful to scrub with the grain direction of the stainless steel.
Do not use cleaners that contain acid, mineral spirits or xylene. Rinse well after
cleaning.
Preserve Your Stainless Steel - Your grill or its cabinet, lid, control panel and shelves
may be made from stainless steel. To keep the stainless steel looking its best is a
simple matter. Clean it with soap and water, rinse with clear water and wipe dry. For
stubborn particles, the use of a non-metallic brush can be used.
m IMPORTANT: Do not use a wire brush or abrasive cleaners
on the stainless steel surfaces of your grill as this will cause
scratches.
m IMPORTANT: When cleaning surfaces be sure to rub/wipe
in the direction of the grain to preserve the look of your
stainless steel.
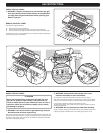
gEnEraL inStrUctionS
gaS inStrUctionS