


Special offers from our partners!

Find Replacement BBQ Parts for 20,308 Models. Repair your BBQ today.
Buy Weber Grill Parts. It couldn't be easier. Find your Weber parts here.

6
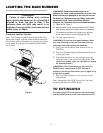
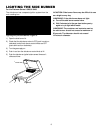
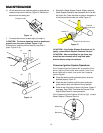
LIGHTING THE MAIN BURNERS
ƽWARNING: Check hose before each use of
barbecue for nicks, cracking, abrasions or cuts. If the
hose is found to be damaged in any way, do not use
the barbecue. Replace using only Weber authorized
replacement hose. Order from Weber-Stephen
Products Co., Customer Service or authorized dealer.
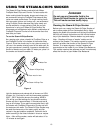
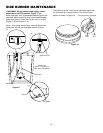
1) Open the lid. Figure 1.
2) Make sure all burner control knobs are OFF. (Push
each burner control knob down and turn clockwise.)
For barbecues equipped with a side burner, push the
burner control knob in and turn clockwise to OFF.
3) Turn gas supply valve on.
ƽWARNING: Do not lean over open barbecue. Keep
your face and body at least one foot away from the
matchlight hole when lighting the barbecue.
4) Push Front burner control knob down and turn to
START/HI.
5) Push the Crossover Ignition Button several times, so
it clicks each time.
6) Check that the burner is lit by looking through the
matchlight hole in the front of the cooking box. (For
closed cart models, open the right door to access
the matchlight hole.)
ƽWARNING: If the burner does not light, turn the
FRONT burner control knob to OFF and wait 5
minutes to let the gas clear before you try again or try
to light with a match.
7) After the FRONT burner is lit you can turn on the
other burners.
Note - Always light the FRONT burner first. The other
burners ignite from the FRONT burner.
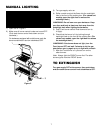
TO EXTINGUISH
Turn gas supply OFF at the source, then push down
and turn each burner control knob clockwise to OFF.
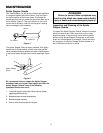
Crossover Ignition System
Note - The Crossover Ignition System ignites the Front
burner with a spark from the igniter electrode inside the
Gas Catcher Ignition Chamber.You generate the energy
for the spark by pushing the Crossover Ignition Button
until it clicks.
Figure 1
ƽDANGER
Failure to open sliding work surfaces
while igniting the barbecue, or not waiting 5
minutes to allow the gas to clear if the
barbecue does not light, may result in an
explosive flame-up which can cause serious
bodily injury or death.
2
1
7
3
4
5
6
Summary lighting instructions are on the control panel.