


Special offers from our partners!

Find Replacement BBQ Parts for 20,308 Models. Repair your BBQ today.

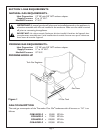
SECTION 4: UNPACKING, MOVING AND PLACING THE UNIT
Leaving the unit on the pallet, move the unit close to the final installation site. Unpack and remove all accessory items, packing
materials and product literature from inside the unit. Verify the gas supply type. If the unit is not compatible with the gas supply,
it will be necessary to convert it for use with the supply. See conversion instructions below.
LOCATING YOUR CHAR GLO
®
BARBECUE
Liquid Propane Conversion to Natural Gas
All models are manufactured at the factory for use with LP
gas, and as such require conversion for use with an NG gas
supply. The conversion should be done by a qualified technician
or your gas supplier. All orifices required for conversion are
provided with the units. The following steps are necessary to
convert for NG operation:
1. Make sure that the unit is disconnected from the gas and
electrical supplies.
2. Remove the grill grates and radiants. Unbolt the main
burners from their attachment at the rear of the burner
box and remove.
3. Remove the knobs and control panel from the unit.
4. Locate the main burner orifices. From inside control
panel area, locate the brass elbows where the orifices
are attached. Use a wrench on the flats of these elbows
to keep them from turning during orifice removal and
installation. Remove the main burner orifices and replace
with the NG orifices supplied, marked 2.06 (46). Do not
over-tighten orifices. Orifice must extend a minimum of
1/8" into main burner air shutter with burner installed.
Make sure burner will not disengage from orifice..
5. From behind the unit, remove the louvered cover on the
infrared rotisserie burner housing.
6. Locate the infrared burner orifice and remove. Replace
with the NG orifice supplied, marked 1.50 (53).
7. Locate the smoker burner. Slide the orifice out of the
burner and remove. Replace with the natural gas orifice
supplied, marked 0.93 (63). Reinstall the orifice into the
burner.
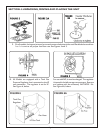
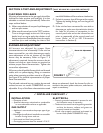
8. On Model CGB48FSZLP, convert the side burners for
NG operation as follows:
A. Remove the grate, burner caps, venturis and burner
bases. See Fig. 3, next page.
B. Remove the burner orifices. Use a 3/16" hex socket
on a 3" ratchet extension and apply a piece of tape
to the socket to hold the orifice in the socket while
removing. See Fig. 3A, next page.
C. Replace with the NG orifices supplied, number 1.86
(49). Tighten until snug. See Fig 3B, next page.
D. Reassemble the burner bases and venturis. Reinstall
burner caps and grate.
NOTE: Install the conversion sticker (supplied)
beside the rating label.
CONVERSION KIT BY MODEL
Model No. Orifice Description Part Number Quantity Remarks
CGB30CZLP 2.06mm (#46) Orifice Hood, Grill Burner 5040000445 2 To Convert LP To NG
1.40mm (#53) Orifice Hood, Infrared Burner 5040000443 1
Conversion Sticker 5040000623 1
CGB36FZLP 2.06mm (#46) Orifice Hood, Grill Burner 5040000445 3 To Convert LP To NG
1.40mm (#53) Orifice Hood, Infrared Burner 5040000443 1
0.93mm (#63) Orifice, Smoker Burner 5040000431 1
Conversion Sticker 5040000623 1
CGB48FSZLP 2.06mm (#46) Orifice Hood, Grill Burner 5040000445 3 To Convert LP To NG
1.40mm (#53) Orifice Hood, Infrared Burner 5040000443 1
0.93mm (#63) Orifice, Smoker Burner 5040000431 1
1.86mm (#49) Orifice, Side Burner 5040006713 2
Conversion Sticker 5040000623 1
CGB48FZLP 2.06mm (#46) Orifice Hood, Grill Burner 5040000445 4 To Convert LP To NG
1.40mm (#53) Orifice Hood, Infrared Burner 5040000443 2
0.93mm (#63) Orifice, Smoker Burner 5040000431 1
Conversion Sticker 5040000623 1
Tools/Parts Required
Socket Driver-1/4" Drive, 3" minimum extension
3/16" Or 7 mm Socket or Wrench
1/2" Deep Well Socket
1/2" Open Wrench
Phillips Screwdriver
Slotted Screwdriver
Masking Tape
Page 5