


Special offers from our partners!

Find Replacement BBQ Parts for 20,308 Models. Repair your BBQ today.

DATE PRINTED: 2/8/05 Revision Date: 02/01/05 PI-1010A Page 26
Maintenance
GASKET INSPECTION
Inspect the gasket for physical deterioration, missing sections or obvious leakage. The stove front should make
a groove in the gasket material - one side of the groove (toward the inside) will often be dark or black, and the
other side (toward the outside) should be light or white. Dark smudges on the outside of the groove may indicate
a smoke leak. If the groove is very shallow or missing, or if there is a heavy ash or creosote deposit along the
bottom edge of the gasket, it may need to be replaced. Frayed or broken gasket material, or a gasket that is
hard and unyielding, will also indicate need for replacement. Any time a piece of gasket is missing, or is broken
anywhere, the entire gasket must be replaced.
To check the gasket further, insert a piece of paper (a dollar bill will work) into the door opening and close and
latch the door. Obvious resistance should be felt when pulling the paper out. Repeat this check several times
around the perimeter of the door.
GASKET REPLACEMENT
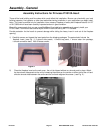
1. If the door gasket is to be replaced, be sure you have some 5/8” fiber glass gasket material, ready to re-
install. See your Blaze King dealer.
2. Be sure the fire is out and the stove has cooled down. The door does not have to be removed from the
stove.
3. With a pair of pliers, pull the old door gasket out of the channel and dispose of it.
4. Thoroughly clean out the channel so the new silicone adhesive will adhere and the gasket will fit smoothly
5. Run a small bead of furnace cement or a high temperature silicone adhesive (such as G.E. Silicone Sealer,
or the equivalent) along the center of the channel. DO NOT USE HOUSEHOLD SILICONE CAULKING.
High temperature silicone may be obtained from your Blaze King dealer or most auto parts stores.
6. Start the new gasket in the lower right corner. Do not stretch or cut the gasket. Distribute the gasket evenly
around the frame.
7. Close the Loading Door and allow the adhesive to dry.
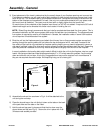
8. Door adjustment: the door seal is adjusted by turning the latch catch on the stove in or out. NOTE THERE IS
A LOCK NUT ON THE LATCH THREAD ON THE OUTSIDE OF THE STOVE, LOOSEN THE LOCK NUT
FIRST and then thread the latch catch in or out to properly adjust the door seal. The gasket should be just
tight enough to test ok as in step 9, do not over tighten the latch which makes the door difficult to latch.
9. Check the fit of the door gasket. Insert a narrow strip of paper into the door opening and close and latch the
door. Obvious resistance should be felt when pulling the paper out. Repeat this check several times around
the perimeter of the door.
CATALYTIC COMBUSTOR, TESTING
Test the catalyst in your Blaze King as follows:
Build a fire using the same technique (paper, kindling, logs) you have used in the past. Leave the thermostat
knob on a medium (2) setting. When the fire is well established (within one to three hours) turn the thermostat
knob to 1.5 or 1.75. A properly operating catalyst will remain active, and the catalyst thermometer will remain in
the "active" zone until the wood load is mostly consumed. A "tired" or "dead" catalyst will, with the thermostat on
1.75 or lower, go out completely, and the thermometer needle will fall into the "inactive" zone. Repeat this proce-
dure several times over several days. (Remember that the catalyst thermometer has a built-in lag of 4-8 min-
utes.) If, after several test burns, the thermometer will not indicate an active" catalyst, it may require cleaning or
replacement. It is also possible that the thermometer, itself, may not be reading accurately. Before condemning
the catalyst, read "Thermometer", on page 28.
CATALYTIC COMBUSTOR, CLEANING
Under certain conditions, ash particles may become attached to the face of the catalyst. These may be seen
while the catalyst is in the glowing stage, or when the fire is out. Any deposit on the visible face of the catalyst
should be removed. Wait until the fire is out and the stove is cold. (Hot ash in a vacuum cleaner bag will burn.)
Brushing the catalyst with an old toothbrush will remove some deposits. Passing a plastic vacuum cleaner wand
or brush near the face of the catalyst will remove most deposits. Never scrape the catalyst with any hard tool.
Some stove owners have run pipe cleaner through every individual cell of the catalyst. This is not needed, and
may actually do more harm than good. Limit cleaning to the face of the catalyst.