


Special offers from our partners!

Find Replacement BBQ Parts for 20,308 Models. Repair your BBQ today.

15
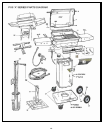
Grill Head Assembly
Instructions
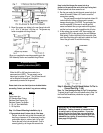
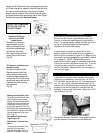
Step 1: Control Panel & Heat Shield
A. Attaching the Heat Shield and Control Panel Assembly
(Fig. 19)
1. Attach the complete control panel assembly to the front of the
grill head with 1/4—20 Kep nuts.
2. Leave the (2) nuts holding the heat shield on, to serve as spacer
nuts.
3. Make sure the valve orifices on the control panel aligns with the
burner venturi correctly and that the venturi tubes go over the
valve orifices at least 1/4" to 1/2" (see fig. 22 on page 22).
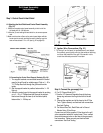
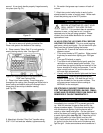
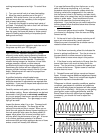
C. Ignitor Wire Connection (Fig. 21)
1. Tip the grill on its back (or upside down) and attach
the control panel ignitor wire to the terminal sticking
out from the bottom of the grill. Be careful not to
crack the delicate porcelain insulator.
1.Connect Ignitor
Wire to Bottom
Of Grill Head
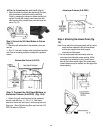
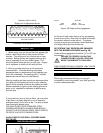
B. Connecting the Control Panel Support Brackets (Fig. 20)
1. Two support brackets are connected beneath the control
panel to the grill head for added support. Push a ¼ - 20 x
1¼" Phillips head bolt through the grill head from the
inside.
2. Slip the support bracket in position, fasten with a ¼ - 20
Kep nut.
3. Attach the control panel to the support bracket by pushing
up a ¼ - 20 x ½" Phillips head bolt through the support
bracket and through the lower lip of the control panel,
fasten with a ¼ - 20 Kep nut.
Fig. 21
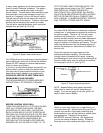
C. For Deck/Patio & In-Ground Mounts using 30" Flexible
tubing. (Fig. 24)
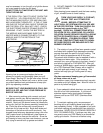
Step 2: Connect the gas supply line
A. For LP Column Model A-LC:
1. Pass the 16” Hose and Regulator through the hose
clamp ring and screw the ring to the front of the left
leg.
2. Connect the regulator end of the hose to the LP-Gas
Tank. Tighten securely and leak test both connections.
See Leak Testing.
B. For Natural Gas Cart, Deck/Patio and In-Ground
Mounts Using 12 foot Hose:
Connect one end of the supplied 12-foot hose to the grill
valve connection behind the control panel. Then, connect
the quick disconnect valve on the hose to the gas supply
line connection. Tighten securely and leak test both
connections. See Leak Testing.