


Special offers from our partners!

Find Replacement BBQ Parts for 20,308 Models. Repair your BBQ today.
10
11
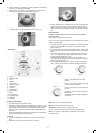
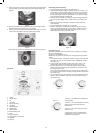
MIN stands for minimum gas consumption rate.
MAX stands for maximum gas consumption rate.
PRESS ON is the position to push down the knob.
To get gas flow if you want to start the appliance, please see point 1
above.
OFF stands for the off-position. In this case the gas flow to the burner is
interrupted completely.
5. Warm up period
After ignition of the grill please preheat the appliance on MAX position
for 8 minutes to prevent the phenomenon of flaring which can occur
during the warm up period. Never move the appliance when it operates
to prevent flaring.
2. Turning off the appliance
Turn the regulator knob clockwise to the “PRESS ON” Position then the
knob will spring up, and then continue to turn the knob to “OFF” Position.
Removing the gas cartridge please see chapter “Removing the gas
cartridge”, point 1 – 3.
Removing the gas Cartridge
The gas cartridge must be removed from the grill if the grill is being trans
-
ported or stored
Remove the gas cartridge outside and away from sources of ignition and
other people.
1. Check that the burner is extinguished before disconnecting the gas
cartridge.
2. Turn the regulator knob to OFF position.
3. Hold the cartridge firmly and unscrew clockwise from the regulator
adaptor.
Changing the gas Cartridge
This appliance shall be only used with Butane-propane mixture
cartridges, complying with EN417.It may be hazardous to attempt to fit
other types of gas cartridge.
Change the gas cartridge away from sources of ignition and other people
1. Remove the old gas cartridge as described in the “Removing the gas
cartridge” section
2. Fit the replacement cartridge as described in the “Connecting the gas
cartridge section”
Replacing the regulator adapter Cartridge seal
The seal is located in a groove at the base of the regulator adapter. To
remove the seal insert a small flat bladed screwdriver into the edge of the
groove and behind the seal the seal can then be levered out. Fit a new
seal by pushing the seal into the base of the adapter and easing it into
the groove using the screwdriver, being careful not to damage the surface
of the seal. Check that the seal is properly located by screwing in a gas
cartridge and checking around the joint using soapy water
Instructions for Cleaning:
CAUTION: Grill surfaces are hot during use. Allow Grill Plate, Drip Tray,
Cover and Grill Body to cool completely before handling and cleaning.
1. Turn the regulator Knob to the OFF position and allow the grill to cool
before disassembling and cleaning.
2. Remove the gas cartridge.
3. Remove the Grill Plate and empty the Drip Tray.
4. Wash the Grill Plate and Drip Tray with warm, soapy water and a
plastic scouring pad. Rinse and dry thoroughly. Do not use steel wool,
coarse scouring pads or harsh or abrasive cleaners. If necessary, use
a nylon bristle brush to loosen hardened food particles.
5. Wash exterior parts with a soft sponge and warm clear water.
Nonabrasive cleaners may also be used.
6. Use a damp cloth to clean the inside of Lid and Grill Body.
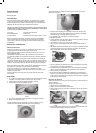
Cleaning the Burner Assembly
IMPORTANT: Clean burner assembly prior to use after storing, at the
beginning of grilling season or an inactive period of one month. Spiders
and insects like to build nests in burner tubes, especially during colder
months. The nests can cause fires in burner tubes or under grill. Make
sure the gas cartridge, Grill Plate and Drip Tray have been removed
before proceeding.
In order to clean the inside of the burner tubes, the Burner Assembly
must be removed from the grill.
1. Remove the gas cartridge, Grill Plate and Drip Tray.
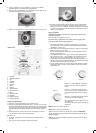
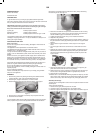
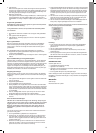
2. Turn the Grill Body upside down. Refer to Figure 15 and locate the
clip that holds the venturi to the Regulator Assembly. Pull straight the
clip off and set it to one side and return the Grill Body to the Upright
position.
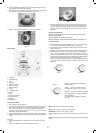
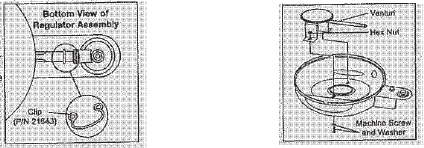
3. Refer to Figure 16 and locate the three machine screws that secu
-
re the Burner Assembly to the grill. Loosen and remove these screws,
making sure you retain the screws, washers and nuts for reassembly.
4. Carefully pull back on the Burner Assembly, disengaging the venturi
from the Regulator Assembly. Please see Figure16. Since the ignitor is
still attached to the Burner Assembly, use care to avoid stressing the
cable. There is enough slack available to allow you to look into the end
of the venturi and clean with a pipe cleaner if needed.
5. When clean, carefully reassemble the Burner Assembly, making sure
the mounting screws are tight and the venturi tube and clip are pro
-
perly connected to the Regulator Assembly.
6. Clean the outside of the Burner Assembly with a paper towel or damp
sponge. Open any clogged holes with a thin wire.
Note: Do not clean the injector (nozzle). If it is blocked send the ap-
pliance to the Service Centre
Figure 15 Figure 16
Storage:
1. Before storing the appliance please disconnect the gas cartridge by
following the instructions of chapter “Changing the Gas Cartridge”,
point 1 – 3.
2. Clean the Grill as instructed above.
3. Store the gas containers outdoors in a well ventilated space and out
of reach of children.
4. Store the gas grill indoors by using the packaging unit or cover it com
-
pletely for protection against dust, water and insects.
General Maintenance and Repair
Do not modify the appliance.
After sales service
The appliance isn’t user–serviceable. If it’s not working properly, check
that you’ve followed the instructions correctly.
GUARANTEE TERMS
The guarantee does not apply:
• if the above instructions are not followed
• if the appliance has been interfered with
• if the appliance has been mishandled, subjected to rough treatment,
or has suffered any other form of damage
• if faults have arisen as a result of faults in your electricity supply.
Due to the constant development of our products in terms of function
and design, we reserve the right to make changes to the product without
prior warning.
IMPORTER
Adexi Group
We cannot be held responsible for any printing errors.