


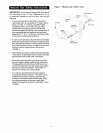

Special offers from our partners!

Find Replacement BBQ Parts for 20,308 Models. Repair your BBQ today.

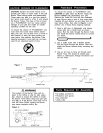
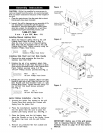
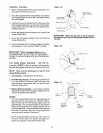
ElectrodeCheck- Requires an Assistant
Before placing the cooking components into your
grill, ensure that the Spark Electrode Tip is properly
positioned within each Gas Collector Box ( a
3-1/4" wide stainless mechanism found at the front
between each set of Burners.) The easiest way to
ensure this is to perform this Electrode Check:
1. Be sure all Control Knobs are set to "OFF"
and open the Grill Lid.
2. Have an assistant stand behind to the right of
the gdll and look down at each Gas Collector
Box. NEVER put your face inside Grill Head.
3. Press the Ignitor Cap. You should hear a
"clicking" sound and your assistant should see
a small blue spark within each Gas Collector
Box. If a spark is present the Electrode Tips
are properly positioned.
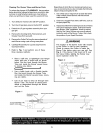
4. If no spark is seen the Spark Gap shown in
Fig. 4 needs to be adjusted as follows:
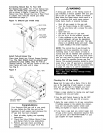
Using an adjustable wrench, loosen the Inside
Nut just until the Gas Collector Box can be
maneuvered and turned upward.
The gap between the Spark Electrode Tip and
Spark receiver should be approximately 3/16".
If the gap is wider than 3/16" use a pair of long
nose pliers and gently squeeze the Gas Collector
Box until the gap is correct.
Return the Gas Collector Box to its original hori-
zontal position, secure the Inside Nut and try the
Electrode Check again.
5. If no "clicking" sound is heard check the following
common causes. If you need assistance call our
Customer Service Helpline
at 1-888-317-7642.
• Ignitor AA battery not installed properly.
• Ignitor wires may be loose. Remove the AA battery,
inspect the Ignitor Junction Box found behind the
Control Panel, and connect any loose wires.
Figure 4 - Side View Figure
GAS COLLECTOR BOX
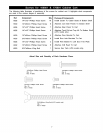
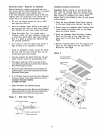
Installing Cooking Components
Important: Before cooking on your grill the first
time, wash the Cooking Grids and Cooking Rack
with warm, soapy water. Rinse and dry thoroughly.
After cooking is completed, turn gdll to HIGH
setting three to five minutes to bum off rear grease
or food residue.
1. Place the three Stainless Steel Flame Tamers
on the lower ledge above Burners. See Fig. 5
2. Evenly space the Stainless Steel Cooking Grids
(cross braces are bottom side) on the ledge
above the Flame Tamers.
.
Place the Stainless Steel Secondary Cooking
Rack into the slots on the upper left and
upper right of Grill Bowl Side Panels. See
Fig.5
4. Remove Fastening Band from Pot Support and
place the Pot Support into the Side Burner
Body-Inner. See Fig.5
Figure 5
S/S SECONDARY
COOKING
S/S COOKING
GRID,
S,/S FLAME
SLOTS FOR
RACK
POT
SUPPORT
SIDE BURNER
12