


Special offers from our partners!

Find Replacement BBQ Parts for 20,308 Models. Repair your BBQ today.

CAUTION : While it is possible for one person to
remove the grill from the carton, it is recommended
that you obtain assistance because of the weight of
the grill.
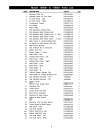
1. Open the parts boxes. Use the parts list to check
that all parts have been included.
2. Inspect the grill for damage as you assemble it. Do
not assemble or operate the grill if it appears
damaged. If there are damaged or missing parts
when you unpack the shipping box, or you have
questions during the assembly process, call:
1-888-317-7642
8 a.m. - 8 p.m CST, Mon. - Fri.
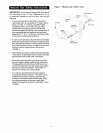
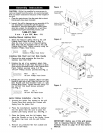
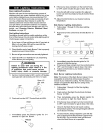
Installing Manual Lighting Stick
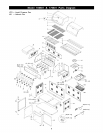
1. Attach the Manual Lighting Stick to the Left
Outside Bowl Panel as shown in Fig. 1.
Align the hole at the end of Manual Lighting
Stick Wire with the threaded hole on the Left
Outside Bowl Panel. Tighten securely using the
M4x8mm Phillips Head Screw.
H035 Qty. 1
M4x8mm Phillips Head Screw
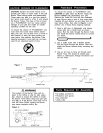
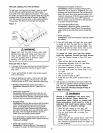
Installing Side Shelf and Cart Side Handle
1. Remove the white protective film from the
stainless steel Side Shelf.
2. Enlisting the aid of an assistant, attach Side
Shelf to left side of gdll. Align the holes on Side
Shelf with the threaded holes on left Outside Bowl
Panel. Tighten securely using 4 of the
1/4"x3/4" Phillips Screws provided.See Fig. 2.
H031 Qty. 4
1/4"x3/4" Phillips Head Screw
3. Enlisting the aid of an assistant, attach Cart Side
Handle to right side of grill. Align the holes on Cart
Side Handle with the threaded holes on right
Outside Bowl Panel. Tighten securely using 4 of
the 1/4"x3/4" Flat Head Screws provided.
See Fig. 2.
H034 Qty. 4
1/4"x3/4" Flat Head Screw
Figure 1
L
OUTSIDE BOWL
PANEL-LEFT
MAx8mm PHILLIPS
HEAD SCREW _.
Figure 2
SIDE SHELF-LEFT
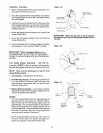
Figure 3
MANUAL LIGHTING
STICK
GRILL HEAD
/
IGNITOR SLOT
OUTSIDE BOWL
PANEL-RIGHT
CART SIDE
HANDLE
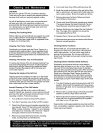
Ignitor Battery Installation - See Fig. 3
1. Unscrew the Ignitor Cap located on the grill
Control Panel and remove the Contact and
Spring from the Ignitor Slot.
2. Place the manufacturer supplied AA battery
into the Ignitor Slot. Be sure to place the
positive pole facing toward you. See Fig. 3
3. Place the Spring over the AA battery, then
place the Contact on top of the Spring. Screw
the Ignitor Cap back onto the grill Control
Panel.
4. Remove any protective film from outside and
inside of Grill Head.
IGNITOR CAP _"
AA BATTERY
CONTACT
11
IMPORTANT: Before use of this grill please
refer to Cleaning Exterior Stainless Steel
Surfaces found on page 18 of this Owner's
Manual.