


Special offers from our partners!

Find Replacement BBQ Parts for 20,308 Models. Repair your BBQ today.

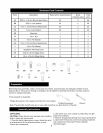
UNPACKING
5.Withtheaidofanassistant,lifttheFireboxfromthe
bottomoftheshippingboxandplaceonprotectedfiat
surface.Becarefulnottodamagehoseandregulator.
6.Removegrillbottompanelfrombottomofshippingbox.
7.RefertothePartsListstocheckthatallpartsare
present.
8.Inspectthegrillfordamageasyouassembleit.Donot
assembleoroperategrillif itappearsdamaged.If there
aredamagedormissingparts,calltheGrillInformation
Centerat 1-800-913-8999.
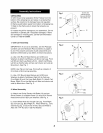
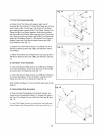
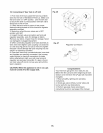
Fig. 1
DD
CC
B
Screws and
washers shown
here are BEHIND
flat surface of D
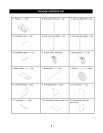
1. Grill Cart Assembly.
IMPORTANT: As an aid to assembly, see the Package
Contents List and Hardware Pack Contents on pages 5,
6, and 7 for pictures and sizes of grill components and
fasteners referenced by key letters in these instructions.
a). Use 4 CO Round Head Screws and 4 DD Lock
Washers to attach Cart Brace, Left (D) to Cart Leg, Front
Left (B) and Cart Leg, Back Left (C). Attach Cart Brace,
Left (D) so that flat side will face cart interior and wide lip
faces down. See Fig. 1.
NOTE: Use Tab on Cart Leg, Front Left as indicator of
Front Side of Grill during assembly.
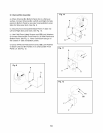
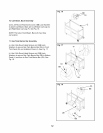
b). Use 4 CC Round Head Screws and 4 DD Lock
Washers to attach Cart Brace, Right (G) to Cart Leg,
Front Right (E) and Cart Leg, Back Right (F). Attach Cart
Brace, Right (G) so that flat side will face cart interior and
wide lip faces down. See Fig. 2.
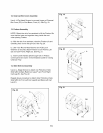
2. Wheel Assembly
a). Attach one Swivel Caster with Brake (H) and one
Swivel Caster (I) to Bottom Panel (J) using 8 CC Round
Head Screws and 8 DD Lock Washers. See Fig. 3.
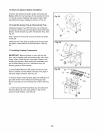
b). Insert Wheel Axle (K) through Cart Leg, Front Right
(E) and Cart Leg, Back Right (F). Place Wheel (L), cone
side facing Leg, on each end of Axle. Secure Wheel to
Axle with 1 FF Nut and 1 GG Flat Washer.
Fig. 2
Fig. 3
Fig. 4
G
\
F
i i' _1
--_J. _ _J-'_-_ CC
8