


Special offers from our partners!

Find Replacement BBQ Parts for 20,308 Models. Repair your BBQ today.

Copies of the I/B. Please reproduce them without any
changes except under special instruction from Team
International BELGIUM. The pages must be reproduced and
folded in order to obtain a booklet A5 (+/- 148.5 mm width x
210 mm height). When folding, make sure you keep the good
numbering when you turn the pages of the I/B. Don’t change
the page numbering. Keep the language integrity. Print only
what is inside the frame.
6 USK GR 32231 - 110127
Assembly page 6/20
Fax +32 2 359 95 50
BEFORE FIRST USE
• Before using the grill for the first time, it’s a good idea to assemble
it fully indoors, to check that you’ve got all the parts and that
they’re all in the right places.
• Clean the grill and all the accessories (Cf. "Cleaning and care"). It
is recommended to heat up the grill for about 10 minutes without
any foodstuff in order to eliminate the grease that may have
adhered during manufacture and the "new" smell.
• Ventilate the room during this period or use outside.
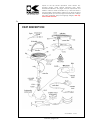
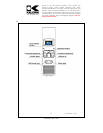
ASSEMBLY
• Align the power inlet on the grill plate with the recess in the side
of the grill housing, and lower the grill plate into the top of the grill
housing.
• The feet underneath the grill plate will rest on 4 specially
strengthened points inside the grill housing.
• The tab in the middle of the recess will go through the slot
underneath the power inlet, and push up the cover inside the
power inlet to expose the earth socket inside the power inlet.
• The earth contact protruding from the temperature control fits
through the hole in the tab, and into this socket.
• If the grill plate is not properly fitted in the grill housing, you will not
be able to fit the temperature control to the grill, and the grill will
not function. This is a safety feature. Do not try to overcome it.
• Do not try to use the grill plate on its own. It must only be used
with the grill housing.
• Push the drip tray into the gap in the side of the grill housing.
• Check that it’s under the holes in the grill plate.
• If you’re not using the stand, sit the grill housing on a stable, level,
heat-resistant surface.
NOTE: If you’re not using the stand, miss out the next assembly points
• Use the screws supplied to attach the 3 stabilizers to the bottom
of the stand.
• The stabilizers fit into the gaps between the legs of the stand.
• Put the stand on a stable, level surface.