


Special offers from our partners!

Find Replacement BBQ Parts for 20,308 Models. Repair your BBQ today.
8
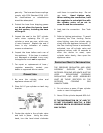
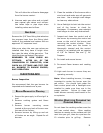
LEAK TEST
1. DO NOT USE OR PERMIT SOURCES
OF IGNITION IN THE AREA WHILE
DOING THE LEAK TEST. THIS
INCLUDES SMOKING.
2. Leak testing should be done once per
year or whenever the LP gas cylinder
or any other gas system part is
replaced, whichever is more frequent.
3. The leak testing solution should be half
liquid detergent and half water.
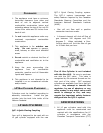
4. Apply the solution to the LP gas
delivery system at points shown in the
illustration.
5. Bubbles in the soap solution indicate
that a leak is present.
6. The leak(s) must be stopped by
tightening the loose joints, if possible,
or by replacing the faulty parts(s) with
the part(s) recommended by the
appliance manufacturer.
THE APPLIANCE IS NOT TO BE USED
UNTIL ANY LEAK IS CORRRECTED.
7. A gas appliance repairman or LP gas
dealer should be called if attempts to
stop the leak(s) are unsuccessful and,
in such case, the LP gas supply must
be shut off at the cylinder valve or the
cylinder must be removed from the
appliance until the leak(s) is corrected.
NATURAL GAS INSTALLATIONS
The outdoor cooking gas appliance and its’
individual shut off valve must be
disconnected from the gas supply piping
system during any pressure testing of that
system at test pressures in excess of ½
psi (3.5 kPa).
The outdoor cooking gas appliance must
be isolated from the gas supply by closing
its’ individual manual shut off valve during
any pressure testing of the gas supply
piping system at test pressures equal to
or less than ½ psi (3.5 kPa).
CONVERSION
PROPANE (LP) TO NATURAL GAS
All gas conversion should be
performed by a qualified gas fitter.
This appliance should only be
converted with conversion kit CON-4
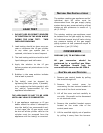
GAS VALVES AND ORIFICES
1. Remove gas control knobs by pulling
the knobs straight off.
2. Remove the control cover by
unscrewing the two screws located on
each end of the front control area.
3. Lift off the cover and set carefully to
one side. Be careful not to disconnect
or cut electrode wires.
4. Remove the manifold bracket screws
located on the under side of the
control panel area.
5. Lift the manifold slightly out of position
by pulling it away from the burners.