


Special offers from our partners!

Find Replacement BBQ Parts for 20,308 Models. Repair your BBQ today.

Hampton HI300 Wood Cast Insert 8
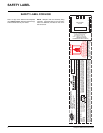
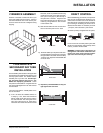
FLUE CONNECTOR
BRACKET
Package contains: 3 brackets and 6 screws.
These brackets are to be used to hold the fl ue liner (not supplied) to
the Insert and keep the connection. The brackets are screwed into
the top of the Insert in the pre-punched holes and then screwed
into the fl ue liner.
INSTALLATION
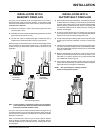
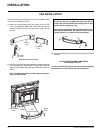
OPTIONAL FLUE
CONNECTOR KIT
The Straight Flue Adaptor (Part #846-504) shown here, may be
used to produce a secure connection between your fl ue connector
and the insert collar. Detailed installation instructions are included
with the kit.
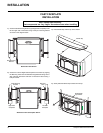
Your insert is very heavy and will require two or three people to
move it into position.
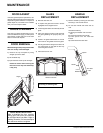
1) Remove the Door to make the insert easier to handle. To remove
the Door, open fully and lift it up off its hinges.
Refer to the Door Removal section for an important note on installa-
tion.
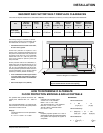
Left Side
Cast
Right Side
Cast
Ashlip
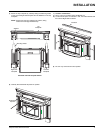
3) Lift the unit up onto the Hearth and slide into the fi replace opening.
Be sure to leave the unit out at least 3 to 4 inches in order to make
the necessary fl ue connections and to install the faceplate.
Be sure to protect your hearth extension during the installation,
ie. with a heavy blanket.
Door
Hinges
DO NOT LIFT UNIT FROM THESE PARTS.
INSTALLING YOUR INSERT
WARNING
DO NOT LIFT OR PUSH THE UNIT FROM THE
ASHLIP, LEFT SIDE CAST or RIGHT SIDE CAST.
THE CASTING WILL CHIP OR BREAK.
STOP! PLEASE READ CAREFULLY.
CAST COMPONENTS ARE VERY FRAGILE.
USE EXTREME CARE WHEN HANDLING.
2) NOTE: For Masonry installation make sure that the fi rebox is level
with the hearth using non-combustible materials and no more than
1/2 to 1 inch of the leveling bolt.