


Special offers from our partners!

Find Replacement BBQ Parts for 20,308 Models. Repair your BBQ today.

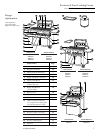
The Rotisserie System
Stainless Steel Outdoor Cooking Center
14
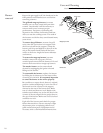
Basting
pan
The location of the burner allows the
placement of the rotisserie basting pan
(included) beneath the food to collect juices
and drippings for basting and gravy.
To flavor the contents of the basting pan, you
can add herbs, onion, garlic or spices. Hams
are especially good with the addition of
pineapple slices and brown sugar to the
basting pan.
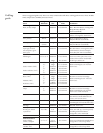
Cooking
times
To help you in planning your rotisserie
cooking, these are representative cooking
times. Refer to a cookbook for suggested
marinade and menu ideas.
Food Setting Approx. Time
Large chicken thighs/kabobs Med. High 40 minutes
Rack of spare ribs High 50 minutes
12–15 lb. Turkey High 3 hours
10 lb. Pork roast High 1
1
⁄
2
–2 hours
8–12 Lamb chops Med. High 20–25 minutes
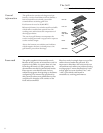
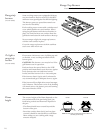
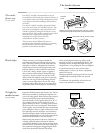
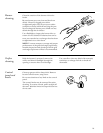
To load the
skewer
1. To load the skewer begin with the handle in
place and slide one of the meat holders, with
the prongs facing away from the handle,
onto the skewer.
2. Push the skewer through the center of the
food, then slide the second meat holder with
the prongs toward the food, onto the skewer.
3. Center the food on the skewer. Push the meat
holders firmly together. (Some models have
grooves on the skewer to indicate the burner
position. Use them to position the meat
holders.) When cooking foods such as multiple
chickens, always place the thickest portion of
the food nearer the center of the skewer.
4. Tighten the wing nuts with pliers. It may be
necessary to wrap the food with butcher’s
string to secure any loose portions. Never
use nylon or plastic string.
5. Once the food is secure, insert the skewer
into the motor. If needed, remove the grill
racks. Place the basting pan beneath the
food. It is normal for the skewer to flex when
larger cuts of meat are being cooked.
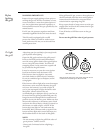
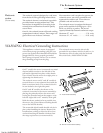
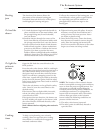
To light the
rotisserie
burner
Open the lid. Push the control knob to the
LITE position.
Press the safety valve button, hold in, and begin
turning the rotary ignitor button located next to
the control knob. It may be necessary to turn
the ignitor knob several times until the burner
lights. You will hear a snapping sound. At the
same time, a spark will be provided at the safety
probe. Once the burner ignites, hold the safety
valve button in for about 10 seconds or until the
burner remains lit.
This is the only burner on the grill with a safety
valve. Once lit, turn the control knob to the
desired setting.
If the burner does not light within 4 seconds,
release the safety valve button and turn the
control knob to OFF.
If the ignitor does not function, the burner can
be lit by holding a lit match to the burner (with
the control knob at LITE and the safety valve
button pressed).
Wait 5 minutes before relighting a hot rotisserie
burner.
NOTE: The location of the rotisserie burner
makes it susceptible to strong wind conditions,
more so than the protected grill burners. For
this reason you should avoid utilizing the
rotisserie burner during windy conditions. As
an added precaution we’ve equipped the
burner with an automatic safety valve which
will not allow gas to flow to the rotisserie
burner unless the following conditions are
present with the knob on:
1. The safety valve button is pressed.
2. The safety probe is sufficiently heated to
open the valve.