


Special offers from our partners!

Find Replacement BBQ Parts for 20,308 Models. Repair your BBQ today.

5
IMPORTANT: This barbecue will not light and will
not heat evenly or cook properly unless the air
shutters are adjusted following installation
(reference 'Air Shutter Adjustment', below).
The burner air shutters are controlled by the two wire
levers at the far right side of the cooking grill (Figure 6).
Light the barbecue in accordance with the
manual
lighting instructions found on page 8 and burn for 5
minutes with the valves on 'HIGH' and the oven open.
ADJUSTING YOUR BARBECUE
g. Refer to the 'Air Shutter Adjustment' instructions
below before replacing barbecue face and knobs.
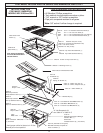
INSTALL THE FLAVOR GRID
Place the flavor grid directly on the burners (Figure 5).
Center the grid over the burners with the open side
up. This allows heat from the burners to be evenly
distributed throughout the cooking area. The flavor grid
heats and cools quickly, making your Fire Magic
Barbecue very responsive to the changes you specify
in grill temperature.
The flavor grid is made of stainless steel and is rust
resistant. It may be cleaned with standard oven
cleaners.
NOTE: Barbecues in some installations achieve a
better air/gas mixture and will ignite more quickly
if the valve is first turned beyond High to Medium
or Low for lighting.
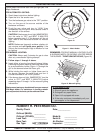
ADJUSTING THE FLAME
The barbecue valve is fully adjustable to any position
between 'HIGH' and 'LOW'. The first position is High,
the second Medium and the final Low. Flame height
can also be set anywhere between the High, Medium,
and Mow settings for all cooking requirements and
tastes.
Height of the flame with the
valve in low position
may be regulated by means of a small adjusting screw
in the center of the valve stem. This screw is accessible
by removing the plastic valve knob which pulls straight
off the end of the valve stem.
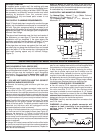
Figure 7
PARTIALLY OPEN
FIGURE 7A
CLOSED
FIGURE 7B
Top View
FLAME ON PORTS
FLAME OFF PORTS
TAB
(TURN TABS)
DIMPLE
NOTCH
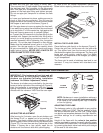
b. Make sure that your gas supply is turned 'OFF'.
Then connect the 1/2" pipe adapter fitting supplied with
the stainless steel flex connector to the gas supply
stub. Use pipe joint compound that is resistant to all
gasses on the male pipe fitting and tighten securely.
Do not use pipe joint compound to connect the flare
fittings.
c. Lower your barbecue into place, making sure not to
pinch or kink the gas connector. The unit may be
supported above the counter by blocks inserted under
the flanges at each side of the frame (Figure 4).
d. If the pipe does not come up against the front wall,
it can easily be run along the enclosure floor and turned
up to rise within 5" of the counter top, tight against the
front wall (leaving space only to connect fittings).
e. Connect the flex connector to the flare fitting on the
manifold inlet. Support the manifold inlet fitting with a
wrench to avoid applying excessive torque to the
manifold assembly while tightening this connection
securely. Do not use pipe compound on flare fittings.
Make sure the barbecue burner valve is in the 'OFF'
position. Turn the gas supply on. Then carefully check
all gas connections for leaks with a brush and soapy
water before lighting. NEVER USE A MATCH OR
OPEN FLAME TO TEST FOR LEAKS.
Figure 4
WIRE LEVERS (2)
AIR SHUTTERS (2)
Figure 6
AIR SHUTTER ADJUSTMENT
After burning for 5 minutes, open the air shutters until
the flames lift off, or appear not to be touching the
burners. Then begin closing the air shutters until the
flames appear to burn while touching the burner ports
(Figure 7B). You may then see short yellow tips on the
flames. If flames are a lazy yellow, open the air
shutters until the flame is blue with yellow tipping.
FLAVOR GRID
FLAVOR GRID
LEG
BURNER
Figure 5