


Special offers from our partners!

Find Replacement BBQ Parts for 20,308 Models. Repair your BBQ today.

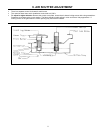
CATHEDRAL CEILING INSTALLATION
Step 1. Follow installation steps 1 and 2 under Vertical
Termination.
Step 2. Using the plumb bob, mark the centerline of the
venting system on the ceiling and drill a small hole
through the ceiling and roof at this point. From the roof,
locate the drill hole and mark the outline of the Cathedral
Ceiling Support Box.
Step 3. Remove shingles or other roof covering as
necessary to cut the rectangular hole for the Support Box.
Cut the hole 1/8 larger than the support Box outline.
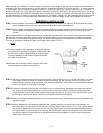
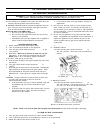
Step 4. Lower the Support Box through the hole in the
roof until the bottom of the Support Box protrudes at
least 2 inches below the ceiling. (Fig. 18). Align the
Support Box both vertically and horizontally with a level.
Temporarily tack the Support Box in place through the
inside walls and into the roof sheathing.
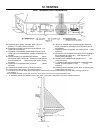
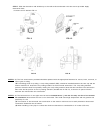
Step 5. Using tin snips, cut the Support Box from the top
corners down to the roofline, and fold the resulting flaps
over the roof sheathing. (Fig. 20). Before nailing it to the
roof, run a bead of non-hardening mastic around the top
edges of the Support Box, to make a seal between the
Box and the roof. Clean our any combustible material
from inside the Support Box.
Step 6. Complete the Cathedral Ceiling Installation by
following the same procedures outlined in Steps 4
through 9 for Vertical Termination.
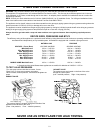
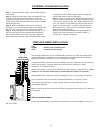
FIREPLACE INSERT INSTALLATION
Parts:
923GK Chimney Liner Termination Kit
923F Co-Linear Flex Connectors
The Envirogas 828 insert may be installed and vented into any solid fuel fireplace that
has been installed in accordance with the National, Provincial/State and local building
codes and has been constructed of non-combustible materials.
An approved throat connector must be installed, to ensure a tight seal, top performance,
safety and efficiency. Carefully follow the manufacturer’s instructions, which
accompany the chimney liner kit.
Measure the height of the chimney before hand and purchase the appropriate kit. Never
attempt to over stretch a flexible liner to accommodate the height of the chimney.
Install sealed throat connector to prevent leakage of room air up through the chimney.
Any flue damper must be removed or blocked permanently in the open position.
The chimney must be clean, in good working order and constructed out of non-
combustible materials.
Make sure that all chimney cleanouts are tightly fitting and will not permit air to leak into
the chimney.
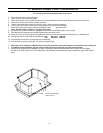
ZERO CLEARANCE INSERTS
Follow the vent installation instructions for Horizontal or Vertical installations using the
GS vent system
18