


Special offers from our partners!

Find Replacement BBQ Parts for 20,308 Models. Repair your BBQ today.

CHG/CHR Page 7
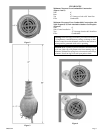
Figure 8
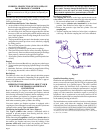
10. Place the hold-down bar under the flicker shield. Push the
flicker shield and hold-down bar up to the bottom of the
outdoor gas fireplace.
Figure 9
11. Insert the 4 5/8" hold down bolt through the hole in hold down
bar and flicker shield and rear burner cross support. Secure
with 5/16" nut from inside of firebox.
Figure 9
12. Move the outdoor gas fireplace to its permanent location.
Follow installation instructions to determine the proper
distances to adjacent combustible materials. Adequate room
must be left behind the outdoor gas fireplace for the LP tank
and to the left side for access to the control panel.
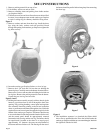
Figure 10
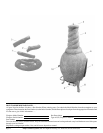
13. Install the three cast iron logs. Install the diagonal center
bottom (#1) log first. Holes in (#1) log are to be positioned
closer to front of burner assembly. Add the left cross (#3) log
and then the right cross (#2) log. Recesses, tabs and holes are
provided to locate the logs properly. See Figure 10 for proper
placement. Installation of logs is completed.
Figure 10
Refer to the following warning.
Warning: Failure to position the parts in accordance with
this photograph or failure to use only parts specifically
approved with this appliance may result in property damage
or personal injury.
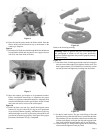
Figure 11
14. Attach the 20 lb. LP tank support hook to the hole located in
the rear center of the outdoor gas fireplace firebox wall. This
hole is approximately 18" from the floor. Use the bolt, washer
and nut provided and tighten by reaching into the firebox.
Figure 11
15. Set the LP tank in place. The gas outlet fitting on the tank
should be facing toward the left when viewed from the front.
The alternate is to face the outlet connection toward the rear.
Lift the tank slightly and hook onto the tank support hook.
One of the holes in the tank handle will fit over the hook.
16. Connect the QCC-1 fitting on the regulator hose to the fitting
on the tank and tighten securely by hand.