


Special offers from our partners!

Find Replacement BBQ Parts for 20,308 Models. Repair your BBQ today.
www.desatech.com
111604-01L 11
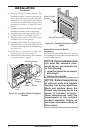
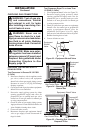
Figure 12 - Inserting Fireplace Into
Cabinet Mantel
INSTALLATION
Continued
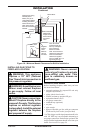
Actual Framing
Height 32
3
/
8
" 33"
Front Width 34
5
/
16
" 35
1
/
8
"
Depth 16
11
/
16
" 17
3
/
4
"
BUILT-IN FIREPLACE
INSTALLATION
Built-in installation of this fireplace involves
installing fireplace into a framed-in enclosure.
This makes the front of fireplace flush with wall.
If installing a mantel above the fireplace, you must
follow the clearances shown in Figure 18, page 13.
Follow the instructions below to install the fireplace
in this manner.
WARNING: A qualified electri-
cian must connect electrical wiring
to duplex outlet for built-in instal
-
lation. Follow all local codes.
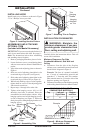
1. Frame in rough opening. Use dimensions
shown in Figure 13 for the rough opening. If
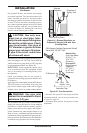
installing in a corner, use dimensions shown
in Figure 14 for the rough opening. The height
is 33" which is the same as the wall opening
above.
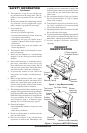
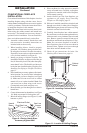
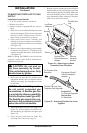
2. If using blower, install duplex outlet to the
right support bracket in the bottom of firebox
(see Figure 15). See
Accessories, page 34. If
not using blower, go to step 7.
3. Route wires from electrical box through
smallest hole in outer casing using strain relief
fitting provided (see Figure 15).
4. Connect wires from the electrical box to
duplex outlet. Match wire colors to those
indicated on duplex outlet. Be sure to connect
ground wire.
5. Install shield to end of right support bracket
and behind the firebox wrapper with 2 screws
provided (see Figure 16, page 12).
6. Plug blower cord into duplex outlet.
7. Replace bottom of firebox and reconnect
remote receiver module to valve.
35
1
/8"
17
3
/4"
33"
Figure 13 - Rough Opening for Installing
in Wall
39
3
/8"
27
7
/8"
55
5
/8"
35
1
/8"
Figure 14 - Rough Opening for Installing
in Corner
Blower
Support
Bracket
Cable from
Electrical Source
Duplex
Outlet
Screw
Blower
Power Cord
Strain
Relief
Fitting
Figure 15 - Connecting Duplex Outlet