


Special offers from our partners!

Find Replacement BBQ Parts for 20,308 Models. Repair your BBQ today.

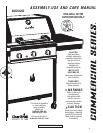
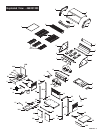
8 • 466231203
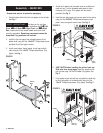
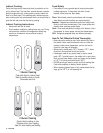
FIGURE 8
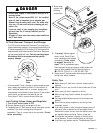
17. Secure grill head to all cart legs using 4 of the 1/4x2-1/2"
Phillips-head screws and 1/4" nuts. See Fig. 8.
18. Fully tighten all leg screws, rear panel screws, door
bracket screws, and grill head screws.
19. From the back of the cart, slide the grease draining tray into
the grill head. Place the grease receptacle into the notches
on the bottom of the tray. See Fig. 8.
Grease
draining
tray
Grease
receptacle
Attach grill head
to all 4 legs
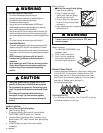
20. Place your LP gas tank (not included) onto the pull-out tank
tray and push tray into cart. Be sure the tank valve is facing
forward. See. Fig. 9. READ USE & CARE SECTION
BEFORE ATTACHING REGULATOR TO LP TANK.
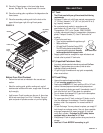
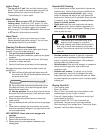
Contact
Spring
AA Battery
21. Unscrew the ignitor cap located on the control panel and
remove the contact and spring from the ignitor slot.
See Fig. 10.
22. Place the supplied AA battery into the ignitor slot with the
positive pole facing toward you.
23. Place the spring with contact over the battery. Screw the
ignitor cap back onto the control panel.
FIGURE 10
Ignitor
cap
+
–
FIGURE 9
LP gas
tank
24. Attach panel to front of sideburner shelf by placing top lip of
panel ABOVE bottom lip of shelf. Secure using three
3/16"x3/8" Phillips-head screws and 3/16" nuts. Fully
Tighten. See Fig. 11.
Panel lip
Shelf
lip
FIGURE 11
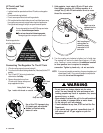
16. Firmly attach ignitor wire from sideburner to the ignitor wire
from the grill head. See Fig. 7a. Beneath left shelf, insert
sideburner valve into sideburner tube. See Fig. 7 for
proper engagement. Attach sideburner valve to shelf using
2 of the M4x10 Phillips-head screws and washers. Place
knob seat, spring, and sideburner knob over valve stem.
Sideburner
tube
Wire from Grill head
FIGURE 7
FIGURE 7a
Valve
Valve
Ignitor
wire
Sideburner
knob
Seat
Spring