


Special offers from our partners!

Find Replacement BBQ Parts for 20,308 Models. Repair your BBQ today.

7
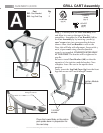
ASSEMBLY GUIDE
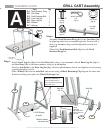
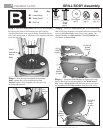
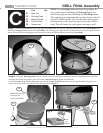
GRILL FINAL Assembly
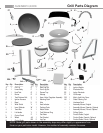
Part Qty.
C1 –
Heat Tent
1
C2 – Cooking Grate 1
C3 – Warming Rack 1
C4 –
Control Knob
1
C5 – Grease tray 1
C1
C3
C4
C5
Step 1 - With the Grill Lid open, place the legs of the Heat Tent (C1) into the matching impressions in the Lower Body. Next,
Place the Cooking Grate (C2)into the Lower Body. The cooking grate ridges should run from front to back of the grill as shown
below. Be sure that the cooking grate rests squarely on the three brackets spaced around the Lower Body.
Step 2 - Place the Warming Rack (C3) into position by first hooking the center pins into the windshield, then rotate the
warming rack down into position. Next, Press the Control Knob (C4) onto the valve stem.
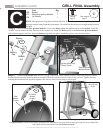
Install the Grease Tray (C5) by sliding the tray onto the Grease Tray Rails from the rear of the grill. Note: The grease tray
rests between the grease tray rail stops. See detail shown in Figure A.
NOTE: The Cooking Grate may have sharp edges. Be
very careful when handling the Cooking Grate. You
should wear gloves when handling the Cooking Grate.
The cooking grate ridges should run from front to back of
the grill as shown below. Be sure that the cooking grate
rests squarely on the brackets spaced around the lower
body. This will make for easier grate cleaning as well.
Grease
Tray
Rails
Visit www.sizzleonthegrill.com/user-forums to chat with Patio Bistro® owners just like you!
Grease
Tray
Rail Stops
Fig. A
C2
Ridges front to
back
Note: The control
knob may be
factory assembled