


Special offers from our partners!

Find Replacement BBQ Parts for 20,308 Models. Repair your BBQ today.
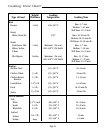
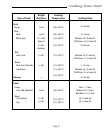
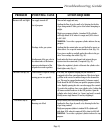
PROBLEM
POTENTIAL CAUSE
ACTION REQUIRED
Blockage in the burner or gas
system
Corroded burner
Improper air shutter opening
Excessively fatty foods
Grease buildup
Uneven burn pattern
or
Flashback fire
Excessive yellow
flame
Flare-up
Electrode fouled
Electrode improperly gapped
Electrode cracked
Lead wire is disconnected
Lead wire is cracked
Battery dead or installed wrong
Igniter does not spark
Page 24
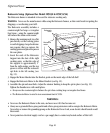
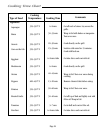
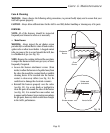
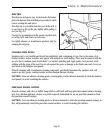
Confirm that the venturi tubes are not blocked by insects or
other debris. Use a special venturi brush to clean (Fig. 16).
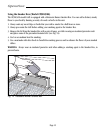
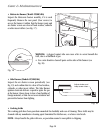
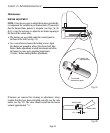
Use a pin or needle to probe the orifice in the gas valve.
Never enlarge the orifice (Fig. 18).
Use a small nail or toothpick to clean the burner ports
(Fig. 18).
Corrosion of a gas burner can cause the solid material
between the gas ports to deteriorate, resulting in uneven
burning. See your retailer for the appropriate replacement
burner.
Wipe the electrode with a soft, clean cloth.
The electrode should be located
1
/
8
” to
3
/
16
” from the
burner, and positioned to spark to the edge of a gas port.
If the gap is incorrect, or the unit is not properly
sparking, gently bend the electrode tip into position. Use
caution so that the ceramic insulator does not crack.
If the ceramic insulator on the electrode is cracked, it
may short out. Replace the electrode.
Confirm that the lead from the Ignitor module to the
electrode is well seated on the termination of the
module.
A crack in the lead wire may result in shorting. Replace
the wire.
The battery in the Igniter Button may be dead or installed
incorrectly. Correct position is positive end down.
Trim all excess fat from meat before cooking.
Confirm that the sear plate is clean and properly installed.
Remove excess grease from the burn chamber.
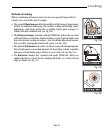
Your Grill should burn with a predominantly blue flame.
If the flame is mostly yellow, check the venturi tubes for
obstruction and clean as shown on Page 19. If yellow flames
still persist, adjust the opening on the air shutter of the
venturi tube located under the front
console of the Grill
(Fig. 21).
Troubleshooting Guide